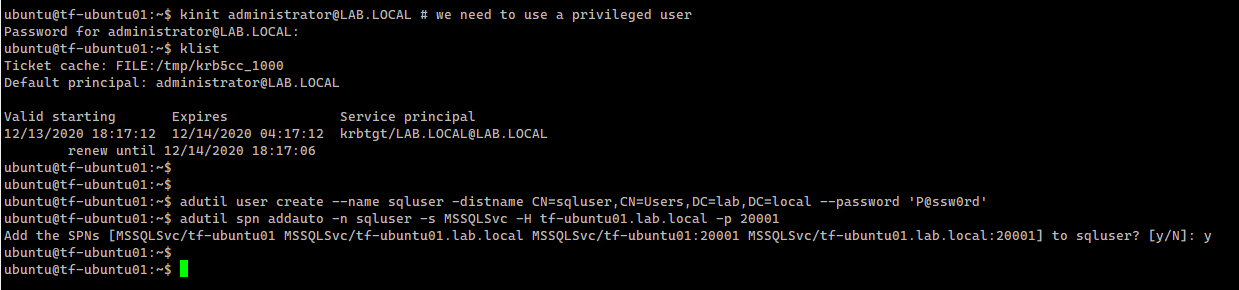
Find forks for a GitHub repository

In a recent episode of Brent Ozar’s Office Hours, someone asked if there are any interesting forks of the First Responder Kit, on GitHub.

So I thought it would be useful to have a way to quickly check for forks and see when they were updated.
I came up with the following PowerShell function which does exactly that.

I hope someone will find it useful.
Enjoy!

Set-MpPreference in Azure Batch flagged as malicious

I will just leave this here, as a future reference.

Apparently, when you try to make add an exclusion for the Windows Defender in an Azure Batch Pool node during a startup script, Microsoft will flag it as malicious. ¯\_(ツ)_/¯


Easily attach StackOverflow database

Brent Ozar maintains a Microsoft SQL Server version of the public Stack Overflow data export.

He provides detailed explanation on how to download, extract and use it.

You need to download the desired versions and put them on your network.

For easy deployment of the StackOverflow database, I’ve put together a PowerShell function that takes care of downloading the files from your domain (if needed), extracting the archives and mounting the files on an existing instance.

The function uses the dbatools and 7Zip4PowerShell PowerShell modules. If they are not present on the host, they will be installed from the official PSGallery.

This will extract the StackOverflow2010.7z archive to D:\Temp, then it will get the default path for Data and Log from the ‘server\instance’, it will move the data and the log files to the appropriate location and then mount them.

The function also offers the possibility to specify that the data and log files should be placed in custom locations.

The full version of the script is available on my GitHub account.

https://github.com/cviorel/PowerShell/blob/main/Get-StackOverflow.ps1

Hope this comes in handy!

Enjoy!

SQL Server Management Studio – automatically get the latest version

When working with SQL Server, I prefer to have a jump host with my tools already installed.

You may also have them on your main laptop/workstation, but I would also recommend to have a VM in the cloud or in your datacenter.

Everyone has a different list of tools they use, but most of the time you’ll find these apps on those lists:

  • command line tools to interact with various cloud providers
  • putty
  • winscp
  • chocolatey
  • SQL Server Management Studio
  • Azure Data Studio
  • git
  • vscode
  • vim
  • various PowerShell modules

In this post I will focus on SQL Server Management Studio.

Since version 18.7, the Azure Data Studio is also included in the installer.

By default Azure Data Studio is installed along with SSMS, but this can be excluded by using:

Eventually, this will not be a valid option, as SSMS will require dependencies provided by Azure Data Studio.

This is a good time to update the script I’m using to automatically install the latest version of SSMS.

I could not find an official manifest with the SSMS versions that I could query, so the script is using the GitHub page where Microsoft publishes the SSMS release notes.

If SSMS is already installed, the script will compare the existing version with the latest one available and it will notify the user.

You can also reference this script directly from my GitHub account.

Feel free to grab it and share it you you find it useful.

Configure Active Directory authentication with SQL Server on Linux

Microsoft just released the adutil in public preview which is a CLI based utility developed to ease the AD authentication configuration for both SQL Server on Linux and SQL Server Linux containers.

We don’t need to switch to a Windows machine to create the AD user for SQL Server and setting SPNs.

In the following steps I will try to install a SQL Server instance on Linux using just the Linux CLI tool adutil.

We will need 2 VMs:
  • tf-wincore01.lab.local – Domain Controller (DC) running on Windows Server 2019 Core (will
    host the lab.local domain)
  • tf-ubuntu01.lab.local – Ubuntu 18.04 LTS – SQL Server Instance on port 20001 will be
    installed here

I will be creating a brand new environment for this test and I am using Terraform to provision the VMs .

Prepare the Domain Controller

Once the VMs are created we need to configure the domain controller:

Let’s setup our zones:

Note that this AD configuration is just the bare minimum for our lab and it’s not fit for a Production environment!

Join the Linux host to the domain

It’s now time to join the Linux box to our new domain. The yaml file used by netplan needs to point to the domain:

Confirm the configuration and apply it.

In my case, the file looks like this:

/etc/resolv.conf file should also point to the domain:

Next, we install the packages that will allow us to join the machine to the domain:

Let’s also set the hostname:

We are now ready to join the machine to the domain:

This command:

  • creates a new computer account in AD
  • creates the /etc/krb5.keytab host keytab file
  • configures the domain in /etc/sssd/sssd.conf
  • updates /etc/krb5.conf

Let’s verify that we can now gather information about a user from the domain, and that we can acquire a Kerberos ticket as that user. The following example uses id, kinit, and klist commands for this.

Install adutil

We now need to install the adutil so we can interact with the Domain Controller directly from the Linux box.

Create a domain user using adutil

Let’s try to create a regular AD user:

At this point adutil cannot list the users, but we can check if an account exists in the AD

Install SQL Server instance on the Linux host

From this point on, I can proceed at installing the SQL Server instance on the Linux host:

Create an AD user for SQL Server and set the ServicePrincipalName (SPN) using adutil

SQL Server instance is running and let’s now create an AD user for SQL Server and set the ServicePrincipalName (SPN) using the adutil tool.

Test the connections and the authentication scheme

Let’s create an AD-based SQL Server login:

Connecting as a domain user from the Linux box:

Let’s verify the authentication scheme:

Conclusion

Our setup is now complete and we managed to perform all the required operations from a Linux machine. The same can be applied to provision SQL Server running on Linux containers. This also should apply if you’re running in the cloud.

Always On Availability Groups using containers

The complete code can be found on my GitHub account

As a SQL Server person, I usually need to work with full blown Availability Groups for my various test scenarios.
I need to have a reliable and consistent way to rebuild the whole setup, multiple times a day.

For this purpose, docker containers are a perfect fit.
This approach will serve multiple scenarios (tsql development, performance tuning, infrastructure changes, etc.)

Target

Using the process I’ll explain below, I will deploy:

  • 3 nodes running SQL Server 2019 Dev on top of Ubuntu 18.04
  • 1 Clusterless Availability Group (also known as Read-Scale Availability Group)

Note that our Clusterless AG is not a high availability or disaster recovery solution.
It only provides a mechanism to synchronize databases across multiple servers (containers).
Only manual failover without data loss and forced failover with data loss is possible when using Read-Scale availability groups.

For production ready and true HA and DR one should look into traditional availability groups running on top of Windows Failover Cluster.
Another viable solution is to run SQL Server instance on Kubernetes in Azure Kubernetes Service (AKS), with persistent storage for high availability.

How

The workflow consist of the following steps:

  • prepare a custom docker image running Ubuntu 18.04 and SQL Server 2019
  • create a configuration file that will be used by docker-compose to spin up the 3 nodes


The actual build of the Availability Group will be performed by the entrypoint.sh script that will run on all the containers based on the image we just created.

The entrypoint.sh file is used to configure the container.
We just need to add a few .sql scripts that will get executed using sqlcmd utility.
In this case is the ag.sql file that contains the commands to create logins, certificates, endpoints and finally the Availability Group.

Remember, we’re using a Clusterless Availability Group, so the SQL Server service on Linux uses certificates to authenticate communication between the mirroring endpoints.

In a matter of minutes I have a fully working AG.

Credentials

During the build of the docker image and to create the AG I will need to specify various variables and credentials.

For production environments the recommended approach to manage secrets is to use a vault.

For my case I’m storing various variables and credentials in plain text files in the env folder.
Docker will parse those files and they will be available as environment variables.

  • sapassword.env – this contains the SA password and it’s needed when the custom image is built.

  • sqlserver.env – various variables are set here and are needed when the custom image is built.

  • miscpassword.env – will be needed to create the login and certificate needed by the Availability Group. This file is actually added to the container and it will be deleted after the Availability Group is created.

The advantage of this approach is that I have only one place where I store all these variables and credentials, but as I mentioned earlier, it’s not a proper solution from a security standpoint.

A few alternative approaches would be:
– use a tool to manage secrets, like Vault
multi-stage builds
– use BuildKit

Conclusion

From a testing and development point of view, this solution works very well for me as I can rebuild the environment in a fast and consistent way.

It’s not by any means the best option out there, but it’s really simple to use and reproduce.

See it in action

Click on the image for the full gif

How to keep your VM templates up-to-date using packer

Today I’m gonna describe the process I’m using to keep my VM templates up to date.

All the scripts that you need to get started can be found on my GitHub repo. Feel free to get them and use them in any way you might find useful.
Make sure you update the variables inside the json\vars.json file to match your environment.

Either if you have a homelab where you test things or have a full enterprise environment, you will need to make sure you are always deploying the same thing across all your environments, every time, without exception.

For a long time sysadmins used hand-crafted golden images for their OSes that they need to further customize every time they were deploying a new VM.

In today’s modern infrastructures, we need to constantly change things and we need a better way to have these golden images tested and kept up to date.

The article here will show how this can be accomplished for a Windows 2019 OS image. I am usually using this to quickly spin up a bunch of VMs on my vCenter.

They will be configured later to host Domain Controllers, SQL Servers, various web applications, etc.

This allows me to focus on my testing and not spend a lot of time on the infrastructure itself.

The tool we’re going to use is Packer.

It will work out of the box with any major cloud providers and because it’s lightweight, portable and command-line driven, it’s suited for Continuous Delivery pipelines, keep dev/prod parity or to package up software with complex requirements.

The installation of Packer is really simple and all the needed steps are described in the docs.

On my GitHub Repo you’ll find a small script that you can use to download the latest version of Packer.

The first step is to have a template for our build. This is just a JSON file that contains information about how packer needs to access my infrastructure, access keys, various settings for my image.

In a second step I need to make sure I have a valid configuration. Packer has a validate command for this:

In step 3, after the validation is successful, I can proceed to building the image.

Notice that I’m passing the var-file option in order to tell packer where my variables are defined.

WARNING: This file will hold your secrets so be very careful about who’s able to access it.

The force option will instruct packer to force a builder to run when artifacts from a previous build prevent a build from running.

This parameter can behave differently for each builder, but in general it will remove the artifacts from the previous build.
Check out the docs about what options you can use for the build command.

At this point we have an image that’s ready to be used.

In the example scripts I’m using, you will notice that in order to allow packer to connect to the image, I enabled WinRM connectivity over http.

This was executed as the last action in the answer_files\win2019core\autounattend.xml file:

This approach is used to perform an Unattended Installation for Windows and this is the reason we have the floppy_files section in our JSON template:

As a good practice we should make sure that after all the customization is done, we should leave the template in a clean and secure state.

This is not a trivial task and should not be taken lightly as doing it wrong can expose you to a bunch of security issues.

It’s not the scope of this article, but you can read a more in-depth analysis on this blog post:

https://missionimpossiblecode.io/post/winrm-for-provisioning-close-the-door-on-the-way-out-eh/

To sum up, in my environment it takes about 8 minutes to finish a build.

I hope this will give you a better insight on how to prepare and maintain your images, either on-premises or in the cloud.

Thanks for reading!

Wrong network location profile causes issues with Windows Failover Cluster

Hi folks,

The other day I was pulling hair from my head trying to configure a Windows Failover Cluster intended for an SQL Server Availability Group setup.

During the cluster validation stage I always got this message:

The Windows Firewall on node node01.domain.local is not properly configured for failover clustering.
In particular, the ‘Public’ firewall profile is enabled on adapter ‘node01.domain.local – SLOT 1 PORT 2’.
The ‘Failover Clusters’ rule group is not enabled in firewall profile ‘Public’.
This may prevent some network communication between cluster nodes.

The OS install and networking part was already configured by a someone else and it was a pretty straightforward installation.

The issue turned out to be caused by the 2 NICs we have for iSCSI traffic which did not have a gateway configured.

Windows uses gateways to identify networks. If it doesn’t have a gateway configured, or if it can’t successfully ping it, it will not be able to identify the network it’s connected to and will assume it’s a public one.

Network cards in Windows can be connected to one of these type of networks:
– Public
– Private
– DomainAuthenticated

By default, the public network location type is assigned to any new networks when they are first connected.

A public network is considered to be shared with the world, with no protection between the local computer and any other computer. Therefore, the Windows Firewall rules associated with the public profile are the most restrictive.

As part of the Windows Failover Cluster validation/creation there are checks to verify connectivity (between cluster nodes, active directory, etc.).

These were the settings I had:
Before

All I needed to do was to move all non-domain network interfaces into the private profile:

After

After the change the cluster creation went without issue.

This small detail be easily missed and can cause a lot of headaches and lost time investigating failover clusters.

Cheers!

Update Ola Hallengren’s IndexOptimize Job to only update statistics

Managing a lot of SQL servers does not have to to be a burden. One or a hundred, should be the same, right?
This is how you can quickly update (on a bunch of servers) the IndexOptimize job which is created if you install the MaintenenceSolution from Ola Hallengren:

Erik Darling (t|b) has written a longer post here.

PS. Check out how to quickly install Ola’s maintenance solution on the dbatools.io website.

Register-PSRepository fails on Powershell Core when running behind a corporate proxy

Trying to register a psrepository behind a corporate proxy fails on Powershell Core.

The error you receive is:

Running the same on Windows Powershell 5.1 works.
Now, let see why it’ not working on Powershell Core.

Trying to find more details about the error message:

Let’s look at the function inside the module where the error is triggered (bonus tip on how to jump directly to the line number)

The error message is misleading, as it turns out the part that is failing is this one:

We know the endpoint location is valid, so that means we cannot pass through the proxy.
Digging around the internet led me to this GitHub issue.

Apparently, .NET Core is not respecting proxy in some cases.

The recommended workaround from Steve Lee is to set

or to create

Turns out our little problem is now fixed and the Register-PSRepository command runs successfully.

I hope this post will save you some time in case you run into the same issue.

Voilà!