Recently I had the oportunity to test SQL Pretty Printer (Add-In for SSMS). I don’t have to waste time formatting long sql queries. In no time, SQL Pretty Printer does the job
for me. It can also translate the sql code into C#, Java, Php and many other program languages so I can use it in my own programs.
SQL Pretty printer is designed to deal with SQL statement used by different Database Such as MSSQL, Oracle, DB2, Informix, Sybase, Postgres, MySQL and so on. The code conforms to most of the entry-level SQL99 Standard.
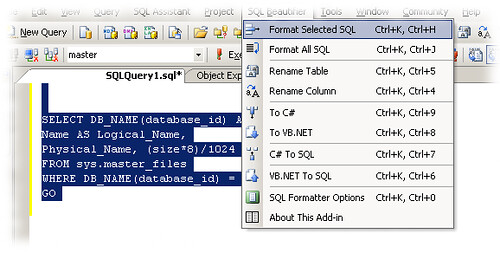
To use this add-in you need to have SQL Server Management Studio (SSMS), with .NET2.0 installed. In sql editor you can use shortcut key (ctrl+k,ctrl+j for all sqls, and ctrl+k, ctrl+h for selected sql). There is also a toolbar with two buttons to format sql or selected sql.
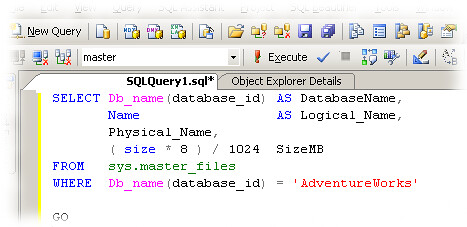
To see it in action, take a look here, where you have some sample code blocks before and after the formatting.

Tag Archives: mysql
Beautify SQL code
Reset the root password on MySQL
Have you ever forgotten the root password on one of your MySQL servers?
This is a quick h00tow (how to) reset your MySQL root password. It does require root access on your server.
First things first. Log in as root and stop the mysql daemon. Now lets start up the mysql daemon and skip the grant tables which store the passwords.
mysqld_safe --skip-grant-tables
You should see mysqld start up successfully. If not, well you have bigger issues. Now you should be able to connect to mysql without a password.
mysql --user=root mysql
update user set Password=PASSWORD('YourNewRootPassword');

flush privileges;

exit;
If you are using Ubuntu 8.04 Hardy Heron, when you try to restart the mysql service using
sudo /etc/init.d/mysql restart
you’ll get an error like
error: 'Access denied for user 'debian-sys-maint'@'localhost' (using password: YES)'
The debian_sys_maint user is the one used by mysql user system under debian sytems.In order to fix this (seeming to be a grant error) do like this:
Save the password of debian-sys-maint user which is localized in /etc/mysql/debian.cnf file (readable only by root):
sudo more /etc/mysql/debian.cnf

# Automatically generated for Debian scripts. DO NOT TOUCH!

[client]

host     = localhost

user     = debian-sys-maint

password = lP3Ufasdas3AVm7EdC

socket   = /var/run/mysqld/mysqld.sock

[mysql_upgrade]

user     = debian-sys-maint

password = lP3Ufasdas3AVm7EdC

socket   = /var/run/mysqld/mysqld.sock

basedir  = /usr

root@scrat:/etc/mysql#
Save somewhere this password, then connect on mysql under root:
mysql -u root -p
and execute following command:
GRANT ALL PRIVILEGES ON *.* TO ‘debian-sys-maint’@'localhost’

IDENTIFIED BY ‘your_password’ WITH GRANT OPTION;
Everything should be OK now.
There is another method to reset the root password on MySQL in Ubuntu:
sudo /etc/init.d/mysql reset-password
Backup your MySQL databases automatically with AutoMySQLBackup
If you are a MySQL user and you want to have a disaster recovery solution, or even as a simple backup, you can write small shell scripts based on mysqldump tool.
For this, you need AutoMySQLBackup. It doesn’t have any real requirements (mysqldump of course is needed – in any mysql client package – and gzip or bzip2 to compress the resulting file) and has all the features I was looking for in such a script.
AutoMySQLBackup has all the features I needed: it can backup a single database, multiple databases, or all the databases on the server; each database is saved in a separate file that can be compressed (with gzip or bzip2); it will rotate the backups and not keep them filling your hard drive (as normal in the daily backup you will have only the last 7 days of backups, the weekly if enabled will have one for each week, etc.). It has also some other features (check the project homepage for full details), that I am not using myself (like email logs for example), but other peoples might find interesting.
All you have to do is to modify a few things:
# Username to access the MySQL server e.g. dbuser

USERNAME=dbuser

# Username to access the MySQL server e.g. password

PASSWORD=password

# Host name (or IP address) of MySQL server e.g localhost

DBHOST=localhost

# List of DBNAMES for Daily/Weekly Backup e.g. "DB1 DB2 DB3"

DBNAMES="all"

# Backup directory location e.g /backups

BACKUPDIR="/var/backup/mysql"

# Mail setup

MAILCONTENT="quiet"
You can run the script manually but you will want to enable it in cron
and run daily.
How-To create a MySQL database and set privileges to a user
MySQL is a widely spread SQL database management system mainly used on LAMP (Linux/Apache/MySQL/PHP) projects.
In order to be able to use a database, one needs to create: a new database, give access permission to the database server to a database user and finally grant all right to that specific database to this user.
This tutorial will explain how to create a new database and give a user the appropriate grant permissions.
For the purpose of this tutorial, I will explain how to create a database and user for the music player Amarok. In order to index its music collection, Amarok quand use a mysql backend.
The requirement for this set up is to have access to a database. We are going to create a database called amarok which will be accessible from localhost to user amarok idetified by the password amarok….
Obviously, we need to to have a mysql server installed as well as amarok:
sudo apt-get install mysql-server amarok
On a default settings, mysql root user do not need a password to authenticate from localhost. In this case, ou can login as root on your mysql server using:
mysql -u root
If a password is required, use the extra switch -p:
mysql -u root -p
Enter password.
Now that you are logged in, we create a database:
mysql> create database amarokdb;

Query OK, 1 row affected (0.00 sec)
We allow user amarokuser to connect to the server from localhost using the password amarokpasswd:
mysql> grant usage on *.* to amarokuser@localhost identified by 'amarokpasswd';

Query OK, 0 rows affected (0.00 sec)
And finally we grant all privileges on the amarok database to this user:
mysql> grant all privileges on amarokdb.* to amarokuser@localhost ;

Query OK, 0 rows affected (0.00 sec)
And that’s it. You can now check that you can connect to the MySQL server using this command:
mysql -u amarokuser -p'amarokpasswd' amarokdb