Microsoft just released the in public preview which is a CLI based utility developed to ease the AD authentication configuration for both SQL Server on Linux and SQL Server Linux containers.
We don’t need to switch to a Windows machine to create the AD user for SQL Server and setting SPNs.
In the following steps I will try to install a SQL Server instance on Linux using just the Linux CLI tool adutil.
- tf-wincore01.lab.local – Domain Controller (DC) running on Windows Server 2019 Core (will
host the lab.local domain) - tf-ubuntu01.lab.local – Ubuntu 18.04 LTS – SQL Server Instance on port 20001 will be
installed here
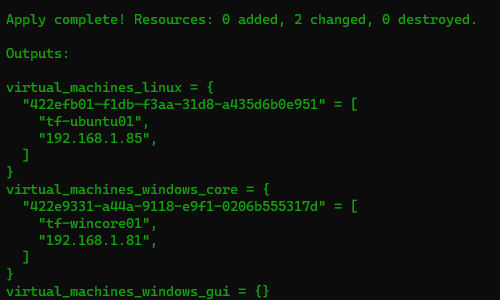
I will be creating a brand new environment for this test and I am using Terraform to provision the VMs .
Prepare the Domain Controller
Once the VMs are created we need to configure the domain controller:
|
1 2 3 4 5 6 7 8 9 10 11 12 13 14 15 16 17 18 19 20 21 22 23 24 25 26 |
# Configure Networking on the DC $InterfaceIndex = $(Get-NetIPAddress -AddressFamily IPv4 | Where-Object { $_.InterfaceAlias -like "Ethernet*" }).InterfaceIndex Set-DnsClientServerAddress -InterfaceIndex $InterfaceIndex -ServerAddresses 192.168.1.105, 192.168.1.1 # Configure the Domain Controller $domainName = 'lab.local' $domainAdminPassword = "SecretPa$w0rd" $secureDomainAdminPassword = $domainAdminPassword | ConvertTo-SecureString -AsPlainTExt -Force $domainName.Split('.')[0] Install-WindowsFeature -Name AD-Domain-Services -IncludeManagementTools # Create Active Directory Forest Install-ADDSForest ` -DomainName "$domainName" ` -CreateDnsDelegation:$false ` -DatabasePath "C:\Windows\NTDS" ` -DomainMode "7" ` -DomainNetbiosName $domainName.Split('.')[0] ` -ForestMode "7" ` -InstallDns:$true ` -LogPath "C:\Windows\NTDS" ` -NoRebootOnCompletion:$True ` -SysvolPath "C:\Windows\SYSVOL" ` -Force:$true ` -SafeModeAdministratorPassword $secureDomainAdminPassword |
Let’s setup our zones:
|
1 2 3 4 5 6 7 8 9 10 11 12 13 14 15 |
# Check the current zones Get-DnsServerZone -ComputerName tf-wincore01 # Add a reverse lookup zone Add-DnsServerPrimaryZone -NetworkId "192.168.1.0/24" -ReplicationScope Domain # Display the list of records in the new DNS zone (it is empty) Get-DnsServerResourceRecord -ComputerName tf-wincore01 -ZoneName lab.local # Create an entry in Active Directory for the Linux host Add-DnsServerResourceRecordA -Name tf-ubuntu01 -ZoneName lab.local -IPv4Address 192.168.1.85 Get-DnsServerResourceRecord -ZoneName lab.local -RRType A # Add a PTR record to the Reverse Lookup Zone for the linux host Add-DNSServerResourceRecordPTR -ZoneName 1.168.192.in-addr.arpa -Name 85 -PTRDomainName tf-ubuntu01.lab.local |
Note that this AD configuration is just the bare minimum for our lab and it’s not fit for a Production environment!
Join the Linux host to the domain
It’s now time to join the Linux box to our new domain. The yaml file used by netplan needs to point to the domain:
|
1 2 3 4 5 6 7 8 9 10 11 |
/etc/netplan/******.yaml network: ethernets: eth0: dhcp4: true dhcp6: true nameservers: addresses: [ **<AD domain controller IP address>**] search: [**<AD domain name>**] version: 2 |
Confirm the configuration and apply it.
|
1 |
sudo netplan apply |
In my case, the file looks like this:

/etc/resolv.conf file should also point to the domain:

Next, we install the packages that will allow us to join the machine to the domain:
|
1 2 |
sudo apt-get install -y realmd krb5-user software-properties-common python3-software-properties packagekit sudo apt-get install -y adcli libpam-sss libnss-sss sssd sssd-tools |
Let’s also set the hostname:
|
1 2 3 4 |
short_hostname=$(hostname) domain='lab.local' fqdn=${short_hostname}.${domain} sudo hostname $fqdn |
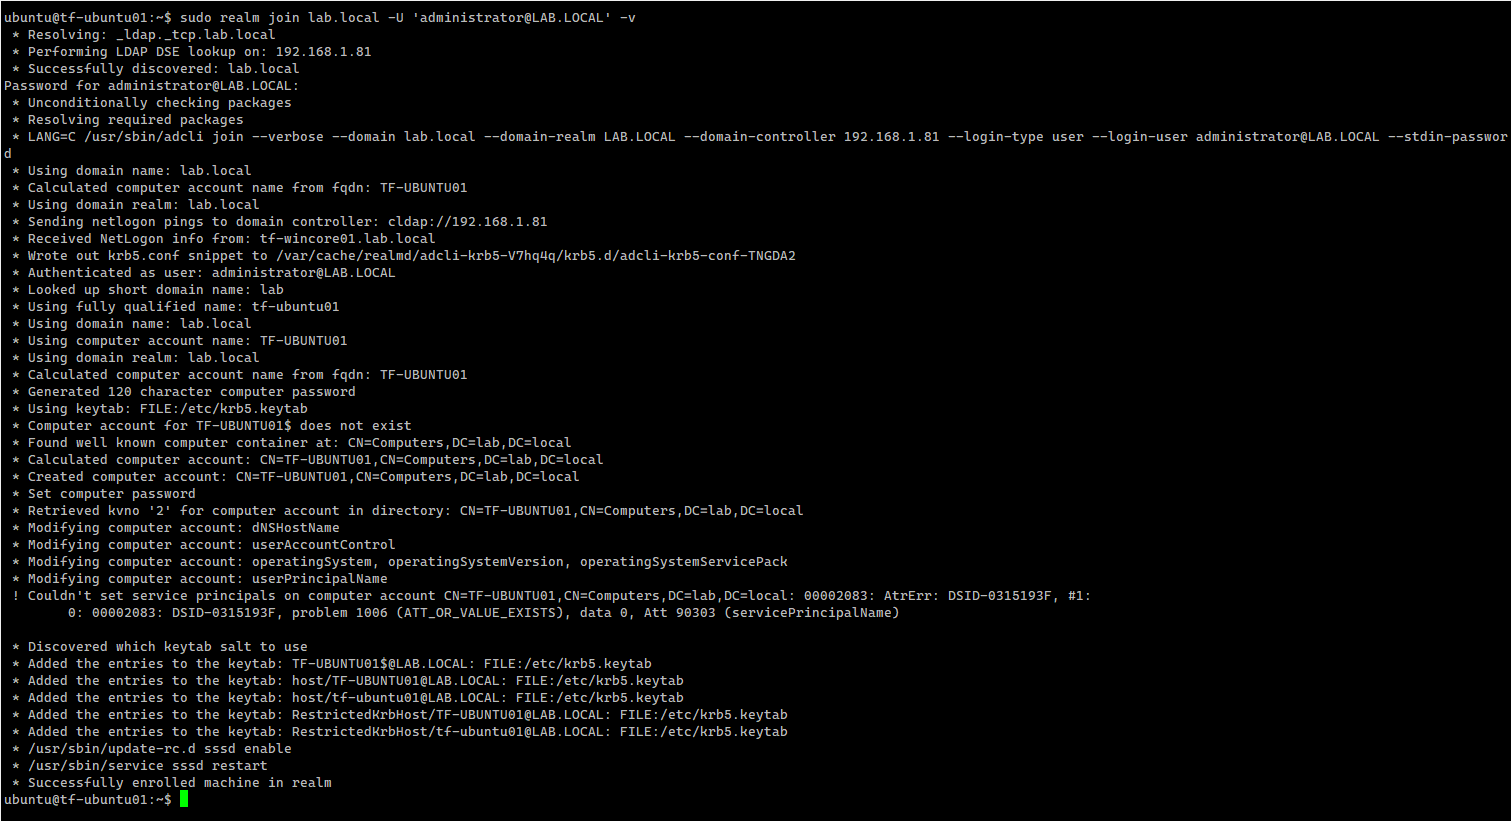
We are now ready to join the machine to the domain:
|
1 |
sudo realm join lab.local -U 'administrator@lab.local' -v |
This command:
- creates a new computer account in AD
- creates the /etc/krb5.keytab host keytab file
- configures the domain in /etc/sssd/sssd.conf
- updates /etc/krb5.conf
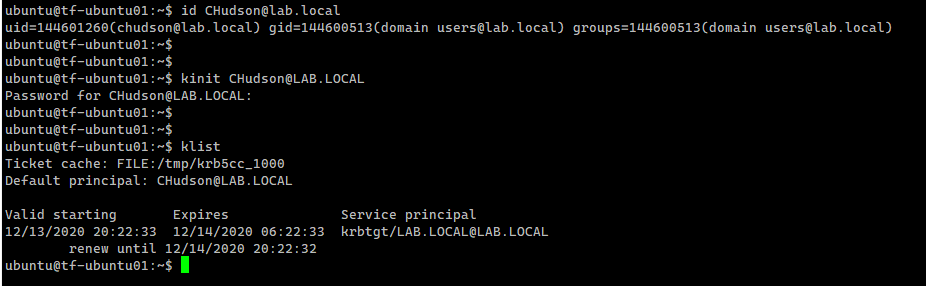
Let’s verify that we can now gather information about a user from the domain, and that we can acquire a Kerberos ticket as that user. The following example uses id, kinit, and klist commands for this.
|
1 2 3 |
id CHudson@lab.local kinit CHudson@LAB.LOCAL klist |
Install adutil
We now need to install the adutil so we can interact with the Domain Controller directly from the Linux box.
|
1 2 3 4 5 6 7 |
# Register the Microsoft Ubuntu repository sudo apt-get update && sudo apt-get install -y curl curl https://packages.microsoft.com/keys/microsoft.asc | sudo apt-key add - sudo curl https://packages.microsoft.com/config/ubuntu/18.04/prod.list | sudo tee /etc/apt/sources.list.d/msprod.list # Install adutil-preview sudo ACCEPT_EULA=Y apt-get install -y adutil-preview |
Create a domain user using adutil
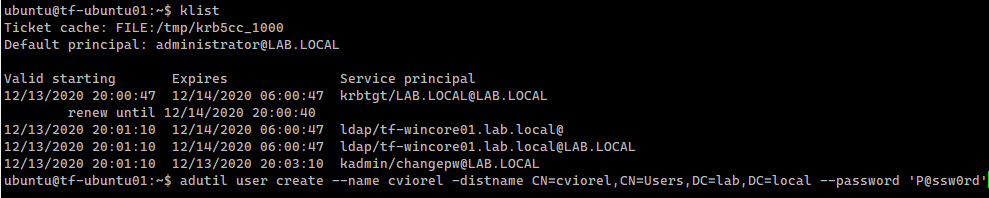
Let’s try to create a regular AD user:
|
1 2 |
kinit administrator@LAB.LOCAL # we need to use a privileged user adutil user create --name cviorel -distname CN=cviorel,CN=Users,DC=lab,DC=local --password 'P@ssw0rd' |
At this point adutil cannot list the users, but we can check if an account exists in the AD
|
1 |
adutil account exists cviorel |

Install SQL Server instance on the Linux host
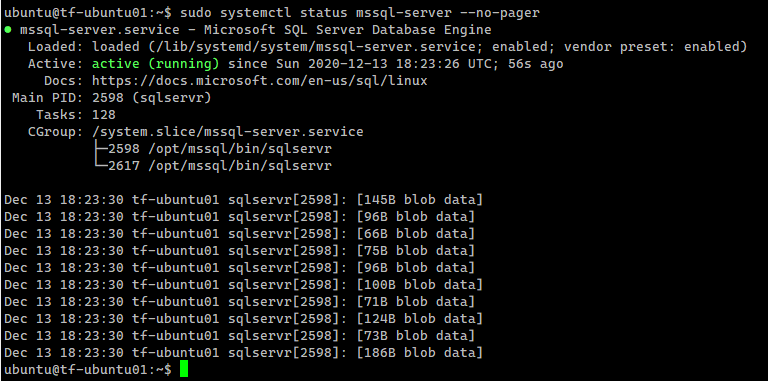
From this point on, I can proceed at installing the SQL Server instance on the Linux host:
|
1 2 3 4 5 6 7 8 9 10 11 12 13 14 15 16 17 18 19 20 21 22 23 24 25 26 27 |
# Install SQL Server on Linux wget -qO- https://packages.microsoft.com/keys/microsoft.asc | sudo apt-key add - sudo add-apt-repository "$(wget -qO- https://packages.microsoft.com/config/ubuntu/18.04/mssql-server-2019.list)" sudo apt-get update sudo apt-get install -y mssql-server # Configure SQL Server sudo /opt/mssql/bin/mssql-conf setup # Enable the SQL Server Agent sudo /opt/mssql/bin/mssql-conf <span class="hljs-built_in">set</span> sqlagent.enabled <span class="hljs-literal">true</span> # Set custom TCP port sudo /opt/mssql/bin/mssql-conf set network.tcpport 20001 sudo systemctl restart mssql-server # Check the configuration systemctl status mssql-server --no-pager # Install the SQL Server command-line tools curl https://packages.microsoft.com/keys/microsoft.asc | sudo apt-key add - curl https://packages.microsoft.com/config/ubuntu/18.04/prod.list | sudo tee /etc/apt/sources.list.d/msprod.list sudo apt-get update sudo apt-get install -y mssql-tools unixodbc-dev echo 'export PATH="$PATH:/opt/mssql-tools/bin"' >> ~/.bash_profile echo 'export PATH="$PATH:/opt/mssql-tools/bin"' >> ~/.bashrc source ~/.bashrc |
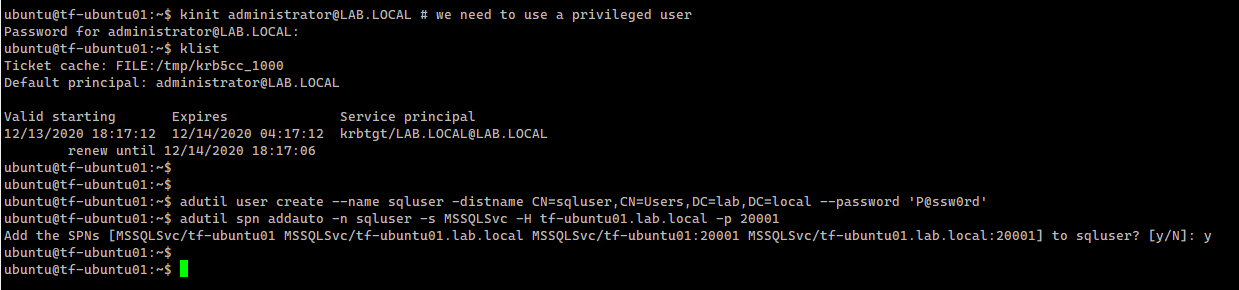
Create an AD user for SQL Server and set the ServicePrincipalName (SPN) using adutil
SQL Server instance is running and let’s now create an AD user for SQL Server and set the ServicePrincipalName (SPN) using the adutil tool.
|
1 2 3 4 5 6 7 8 9 10 11 12 13 14 15 16 17 18 |
kinit administrator@LAB.LOCAL # we need to use a privileged user adutil user create --name sqluser -distname CN=sqluser,CN=Users,DC=lab,DC=local --password 'P@ssw0rd' # Register SPNs to the principal created above. We use port 20001/tcp for the SQL Server instance adutil spn addauto -n sqluser -s MSSQLSvc -H tf-ubuntu01.lab.local -p 20001 adutil keytab createauto -k /var/opt/mssql/secrets/mssql.keytab -p 20001 -H tf-ubuntu01.lab.local --password 'P@ssw0rd' -s MSSQLSvc # Add an entry in the keytab for the principal name and its password that will be used by SQL Server to connect to AD adutil keytab create -k /var/opt/mssql/secrets/mssql.keytab -p sqluser --password 'P@ssw0rd!' # Set proper permissions to the mssql.keytab file chown mssql. /var/opt/mssql/secrets/mssql.keytab chmod 440 /var/opt/mssql/secrets/mssql.keytab # Configure SQL Server to use the keytab /opt/mssql/bin/mssql-conf set network.kerberoskeytabfile /var/opt/mssql/secrets/mssql.keytab /opt/mssql/bin/mssql-conf set network.privilegedadaccount sqluser |


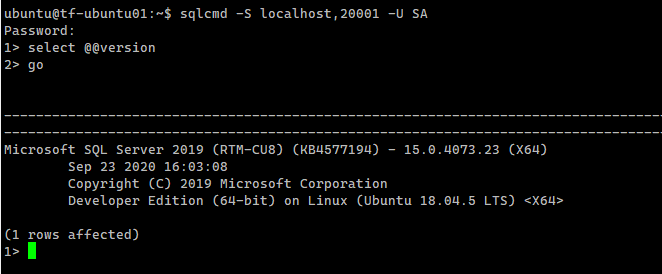
Test the connections and the authentication scheme
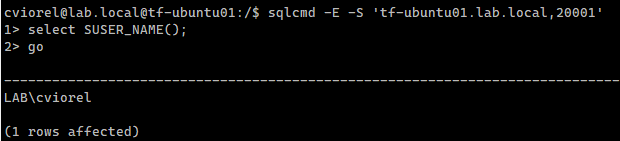
Let’s create an AD-based SQL Server login:
|
1 2 |
CREATE LOGIN [LAB\cviorel] FROM WINDOWS; SELECT name FROM sys.server_principals; |
Connecting as a domain user from the Linux box:
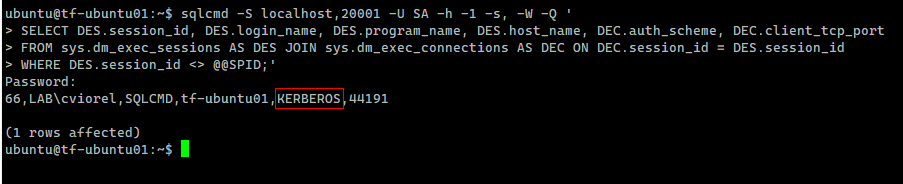
Let’s verify the authentication scheme:
|
1 2 3 4 |
sqlcmd -S localhost,20001 -U SA -h -1 -s, -W -Q ' SELECT DES.session_id, DES.login_name, DES.program_name, DES.host_name, DEC.auth_scheme, DEC.client_tcp_port FROM sys.dm_exec_sessions AS DES JOIN sys.dm_exec_connections AS DEC ON DEC.session_id = DES.session_id WHERE DES.session_id <> @@SPID;' |
Conclusion
Our setup is now complete and we managed to perform all the required operations from a Linux machine. The same can be applied to provision SQL Server running on Linux containers. This also should apply if you’re running in the cloud.