Category Archives: Linux - Page 6

XMMS, Audacious, BMP equalizer presets

When using XMMS, Audacious or BMP on Linux, some of you miss the equalizer presets from Winamp.
This is how you can get them in your linux distribution.
Write a shell script or just run these commands in your terminal:

The script will activate presets for XMMS, Audacious and BMP. If you don’t use all of them, feel free to remove the appropriate line.

xmms_presets

Have fun!

HOWTO make DVD and CD .iso images using dd or cat in Linux

Please note that making security backups of your DVD/CD:s may be illegal in your country.

for the purpose of making these backups, the programs you need are standard, *NIX programs, and it is a safe bet that you wont need to install anything.
You may also need to have root permissions in able for you to access the DVD or CD devices.

Heres how to back up the device:

with cat:

with dd:

replace /dev/dvd0 with what ever device it is corresponding with your CD/DVD rom player. If you’re unsure, you might find that $ cat /etc/fstab might provide you some useful information.

The two commands above copies the CD rom or DVD to the home folder. Making a image file with the iso 9660 or the Universal Disk Format file system. Please note that neither cat nor dd cares about file system. Dd copies blocks, and cat prints a file to stdout.

I have heard that cat does not copy the mbr record of the devices copied with it, but I know that dd does.

Note that if you’ve made the image file as the root user, you might have to chmod the file, and it might also be nice to change the files ownership

how to loopback mount the .iso file:

replace iso9660 with udp if your mounting a dvd image.

and how to umount it:

or

Unp

Unp is a small perl script which makes extraction of any archive files a bit easier. It support several compressors and archiver programs, chooses the right one(s) automatically and extracts one or more files in one go.

Instalation:
sudo apt-get install unp

Usage:
usage: unp file [file]...
file: compressed file(s) to expand

Use -- to pass arguments to external programs, eg. some tar options:
unp fastgl.tgz xmnt.tgz -- -C /tmp

Special option:
-f Continue even if program availability checks fail
-u For Debian packages:
- extract data.tar.gz after each operation
- extract control.tar.gz in control//
For other archives:
- create directory /
- extract contents there

currently supported extensions and formats are
tar[.gz,.bz2], gz, bz2, Z, ar/deb, rpm, shar, rar, arj, zip, LHa, cab, ace,
tnef, uu (mail, news), mime, hqx, sea, zoo, pmd, cpio, afio, lzop

Problem:
It doesn’t extract files from RAR archives with full path!

SSHMenu

SSHMenu is a GNOME panel applet* that keeps all your regular SSH connections within a single mouse click.

To install it on Ubuntu, add this entry to your /etc/apt/sources.list:
deb http://sshmenu.sourceforge.net/debian stable contrib
Then you have to import the repository key:
gpg --keyserver subkeys.pgp.net --recv-keys 4CC00851
gpg --export --armor 4CC00851 | sudo apt-key add -
Run:
sudo apt-get update
and then:
sudo apt-get install sshmenu-gnome
Here is a screenshot:

sshmenu

Installing Google Earth in Ubuntu (7.10 Gutsy)

If you like Google Earth then you will like it in Ubuntu. Installation is simple, here we go:
1. Open a terminal
Insert this code:
wget http://dl.google.com/earth/client/current/GoogleEarthLinux.bin
2. When the file has finished downloading, insert this code in your terminal to install:
sudo sh GoogleEarthLinux.bin
3. The Google Earth Setup window opens, if the default installation paths are fine to you, click ‘Begin Install’
4. The program installs itself and when it has completed click ‘Start’.

Advanced mode (using Medibuntu repository):
1. Add Medibuntu to your sources.list, as well as its GPG key to your keyring. Make sure to use the correct sources.list that corresponds to your current distribution:
Ubuntu 6.06 “Dapper Drake”:
sudo wget http://www.medibuntu.org/sources.list.d/dapper.list -O /etc/apt/sources.list.d/medibuntu.list
Ubuntu 6.10 “Edgy Eft”:
sudo wget http://www.medibuntu.org/sources.list.d/edgy.list -O /etc/apt/sources.list.d/medibuntu.list
Ubuntu 7.04 “Feisty Fawn”:
sudo wget http://www.medibuntu.org/sources.list.d/feisty.list -O /etc/apt/sources.list.d/medibuntu.list
Ubuntu 7.10 “Gutsy Gibbon”:
sudo wget http://www.medibuntu.org/sources.list.d/gutsy.list -O /etc/apt/sources.list.d/medibuntu.list
Then, add the GPG Key:
wget -q http://packages.medibuntu.org/medibuntu-key.gpg -O- | sudo apt-key add - && sudo apt-get update
2. Insert this code in your terminal to install:
sudo apt-get install googleearth
3. Enjoy!

Installing NoMachine NX on Ubuntu 7.10

NX allows you to run remote X11 sessions even across slow or low-bandwidth network connections, making it possible to start sessions from clients running on Windows, Linux, Mac OS X and Solaris platforms to servers running, at present, on Linux or Solaris. Note that development for extending server support to Windows and Mac OS X platforms is in progress.

NX, thanks to exclusive X protocol compression techniques and an integrated set of proxy agents, improves the power of the X Window System to transparently run graphical desktops and applications through the network, by reducing round-trips and implementing strict flow-control of data traveling through low-bandwidth links. Even on slow or low-bandwidth network connections, you can get impressive performance thanks to NX’s lazy encoding algorithm and NX’s capability to automatically tune itself to network bandwidth and latency parameters.

Moreover, NX also can connect to remote RDP and VNC servers, relying on the rdesktop and TightVNC clients by encapsulating the RDP or RFB session within the X11 session.

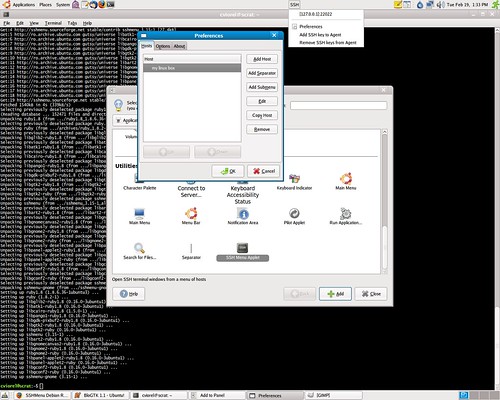
Here’s a screenshot:

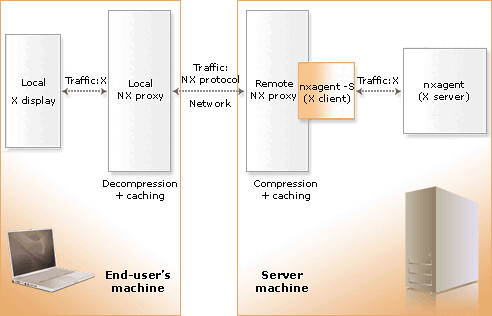
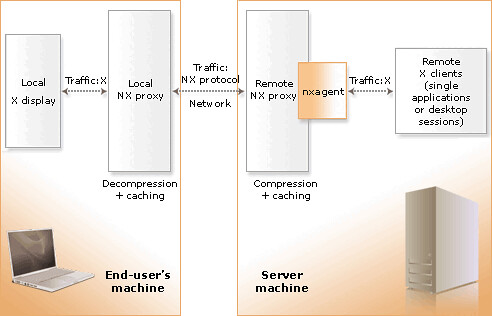
Diagrams showing how NX works. (Copyright NoMachine)

Session shadowing

Desktop sharing

An X11 session

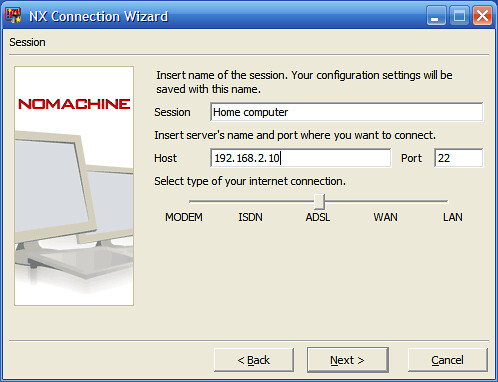
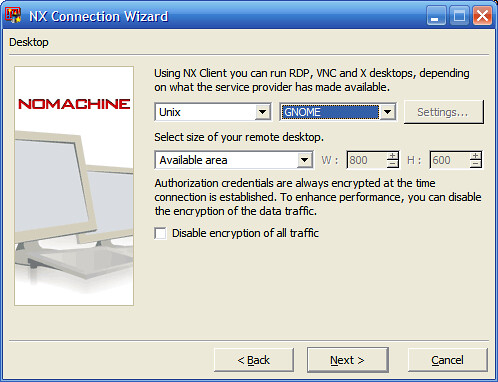
Look at the screenshots below to find out how to get started with NX:

First download the files for the server from here.

For Ubuntu, use NX Free Edition for Linux DEB – i386.

You’ll need to download three files: client, node and server.

Change your working directory to the location where you saved the package and install it by running from a console:

For detailed instructions on how to install the NX Client, NX Node and NX Server packages, please look here.
sudo dpkg -i nxclient_3.1.0-2_i386.deb
sudo dpkg -i nxnode_3.1.0-3_i386.deb
sudo dpkg -i nxserver_3.1.0-2_i386.deb

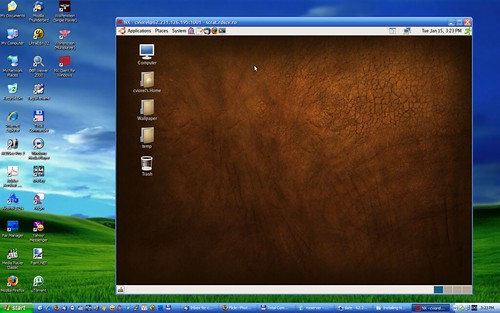
After installing the server, on your Windows computer, download nxclient for Windows and install it.

Once it’s installed, run it, and enter the IP address of your Linux computer to connect, give it a session name for your own reference, and choose your connection speed.

Here you can download the manual or you can view it online here.

KeyTouch – The easy way to enable multimedia-keys!

Screenshot-keyTouch 2.3

Keytouch allows the selection of profiles to select your keyboard model from a list in its database. If your keyboard is not present, you can “train” it by starting up keytouch editor and pressing the relevant keys whilst identifying them.

It comprises of two tools: KeyTouch – The tool to setup a keyboard that is already in the database.
KeyTouch-Editor – The tool to setup your keyboard by teaching it. You select your multimedia keyboards input, then press keys and indetify them from a drop down list. Save the configuration file when your done and simply import into Keytouch itself.

Installing KeyTouch & KeyTouch Editor
Open a terminal and enter these commands:
sudo apt-get install keytouch keytouch-editor

More details, here.

Vista Incapable Stickers (Designed for)

65578-1

iftop: display bandwidth usage on an interface

iftop does for network usage what top does for CPU usage. It listens to network traffic on a named interface and displays a table of current bandwidth usage by pairs of hosts.
More info here.