If you’re using a CUPS printer on Ubunutu (or other linux distro) you may not print from Java.
There is a quick fix taken from here.
Add an /etc/cups/client.conf file containing:
|
1 |
ServerName localhost |
If you’re using a CUPS printer on Ubunutu (or other linux distro) you may not print from Java.
There is a quick fix taken from here.
Add an /etc/cups/client.conf file containing:
|
1 |
ServerName localhost |
Hi folks!
I’ve been using Terminator for quite a long time now and I find it very usefull.
Install it in Ubuntu by running:
|
1 |
sudo apt-get install terminator |
There is a feature I would like to see in the future releases: saving the layout of the window or maybe a way to start the application with the predefined number of tabs.
Yeap, Nokia N73 is a great phone and the N-Series PC Suite looks very nice.
But if you are using Linux, you can’t use the Windows PC Suite. Don’t hurry to fire up a Virtualbox or VMWare machine running Winblows just for that. My guess is is that if you are using an USB cable, it won’t work.
But the good news is that you can use OpenSync to synchronize your Nokia Symbian based phone, with your Evolution (Calendar, Tasks and Contacts) and/or with Google Calendar.
OpenSync act as an mediator between to entity to be synchronized, mapping the data between the entities types and synchronizing when possible the records exchanged, in case of conflict the standard behavior is to prompt the user for correction/decision.
I will explain the steps to you need to follow to sync a Nokia N73 (or any Symbian based phone) with Linux (I used Ubuntu 8.04), via bluetooth. Many credits going to Nailor which posted a nice guide on Ubuntu Forums.
1. Install the needed packages:
|
1 2 3 4 5 6 7 |
sudo apt-get -y install multisync-tools sudo apt-get -y install multisync0.90 sudo apt-get -y install opensync-plugin-evolution sudo apt-get -y install opensync-plugin-irmc sudo apt-get -y install opensync-plugin-syncml sudo apt-get -y install opensyncutils sudo apt-get -y install opensync-plugin-google-calendar #if you wish to synchronize with Google Calendar |
2. Configure msynctool:
You can configure opensync via a graphical interface using multisync-qad (using similiar settings as below) or you can use command line. Guide below is for commandline.
|
1 |
msynctool --addgroup Nokia |
Add plugins to group. If you get errors, they are propably due to missing plugins so check you’ve installed all required plugins.
|
1 2 |
msynctool --addmember Nokia evo2-sync msynctool --addmember Nokia syncml-obex-client |
Next is the ‘trickiest’ part. Installed plugins need to be configured. First, you have to find your phone’s MAC. Use hcitool to do that:
|
1 |
hcitool scan |
It should return something like:
|
1 2 |
Scanning ... xx:xx:xx:xx:xx:xx cviorel-N73 |
Now, configure the syncml-obex-client:
|
1 |
msynctool --configure Nokia 2 |
Replace the context of the configuration (should be open in separate editor after running previous command) with the following XML:
|
1 2 3 4 5 6 7 8 9 10 11 12 13 14 15 16 17 18 19 |
<config> <bluetooth_address>xx:xx:xx:xx:xx:xx</bluetooth_address> <bluetooth_channel>10</bluetooth_channel> <interface>0</interface> <identifier>PC Suite</identifier> <version>1</version> <wbxml>1</wbxml> <username></username> <password></password> <type>2</type> <usestringtable>1</usestringtable> <onlyreplace>0</onlyreplace> <!-- This needs to be set to 10 000, otherwise you'll be sending more data than your phone can handle. --> <recvLimit>10000</recvLimit> <maxObjSize>0</maxObjSize> <contact_db>Contacts</contact_db> <calendar_db></calendar_db> <note_db></note_db> </config> |
To find out what bluetooth_channel to use, run:
|
1 |
sdptool browse xx:xx:xx:xx:xx:xx |
and look for SyncMLClient:
|
1 2 3 4 5 6 7 8 9 10 11 12 13 14 15 16 |
Service Name: SyncMLClient Service RecHandle: 0x10011 Service Class ID List: UUID 128: 00000002-0000-1000-8000-0002ee000002 Protocol Descriptor List: "L2CAP" (0x0100) "RFCOMM" (0x0003) Channel: 10 "OBEX" (0x0008) Language Base Attr List: code_ISO639: 0x454e encoding: 0x6a base_offset: 0x100 Profile Descriptor List: "" (0x00000002-0000-1000-8000-0002ee000002) Version: 0x0100 |
After configuring the syncml-obex-client it’s time to configure evo2-sync. Open configuration file with command:
|
1 |
msynctool --configure Nokia 1 |
It should look like this, so you don’t need to modify it:
|
1 2 3 4 5 |
<config> <address_path>default</address_path> <calendar_path>default</calendar_path> <tasks_path>default</tasks_path> </config> |
4. Sync!
You should be good to go now, so you should try synchronizing:
|
1 |
msynctool --sync Nokia |
aria2 is a command line utility for downloading files. The supported protocols are HTTP(S), FTP, BitTorrent (DHT, PEX, MSE/PE), and Metalink. To install it on Ubuntu, just type in terminal:
|
1 |
sudo apt-get install aria2 |
By default Ubuntu Loads Gnome GUI.
If you need to disable X.org / Gnome under Linux, so you can get text only login, this is the right guide to follow.
Using command line (CLI):
Ubuntu comes with rcconf and update-rc.d command.
rcconf allows you to control which services are started when the system boots up or reboots. It displays a menu of all the services which could be started at boot.
The ones that are configured to do so are marked and you can toggle individual services on and off.
Install rcconf:
|
1 |
sudo apt-get install rcconf |
Now start rcconf:
|
1 |
sudo rcconf |
Now you will be prompted for the administrator password, this is necessary because the changes done with this tool will affect the whole system. After entering the administrator password, the following text based window is displayed on screen: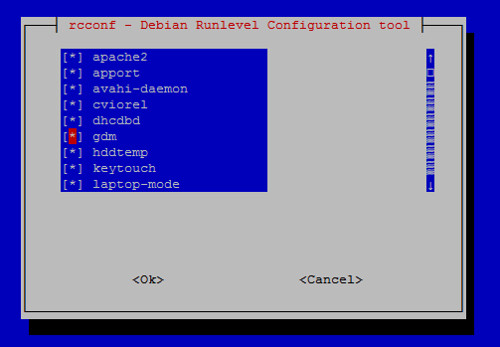
Next enable/disable GDM service by pressing space bar (check the checkbox) > Click OK to save the changes.
Using GUI tools:
The Services Administration Tool allows you to specify which services will be started during the system boot process.
You can type the command:
|
1 |
services-admin |
Or just click on System -> Administration -> Services
Again you will be prompted for the administrator password, this is necessary because the changes done with this tool will affect the whole system. After entering the administrator password, the following window is displayed:

Make sure you remove GDM (Gnome login manager) by disabling the the checkbox and close the window.
Alternative method (wich seems to be a better approach):
|
1 2 |
sudo mv /etc/rc2.d/S30gdm /etc/rc2.d/disabled-S30gdm sudo mv /etc/rc2.d/K30gdm /etc/rc2.d/disabled-K30gdm |
Have you ever forgotten the root password on one of your MySQL servers?
This is a quick h00tow (how to) reset your MySQL root password. It does require root access on your server.
First things first. Log in as root and stop the mysql daemon. Now lets start up the mysql daemon and skip the grant tables which store the passwords.
mysqld_safe --skip-grant-tables
You should see mysqld start up successfully. If not, well you have bigger issues. Now you should be able to connect to mysql without a password.
mysql --user=root mysql
update user set Password=PASSWORD('YourNewRootPassword');

flush privileges;

exit;
If you are using Ubuntu 8.04 Hardy Heron, when you try to restart the mysql service using
sudo /etc/init.d/mysql restart
you’ll get an error like
error: 'Access denied for user 'debian-sys-maint'@'localhost' (using password: YES)'
The debian_sys_maint user is the one used by mysql user system under debian sytems.In order to fix this (seeming to be a grant error) do like this:
Save the password of debian-sys-maint user which is localized in /etc/mysql/debian.cnf file (readable only by root):
sudo more /etc/mysql/debian.cnf

# Automatically generated for Debian scripts. DO NOT TOUCH!

[client]

host     = localhost

user     = debian-sys-maint

password = lP3Ufasdas3AVm7EdC

socket   = /var/run/mysqld/mysqld.sock

[mysql_upgrade]

user     = debian-sys-maint

password = lP3Ufasdas3AVm7EdC

socket   = /var/run/mysqld/mysqld.sock

basedir  = /usr

root@scrat:/etc/mysql#
Save somewhere this password, then connect on mysql under root:
mysql -u root -p
and execute following command:
GRANT ALL PRIVILEGES ON *.* TO ‘debian-sys-maint’@'localhost’

IDENTIFIED BY ‘your_password’ WITH GRANT OPTION;
Everything should be OK now.
There is another method to reset the root password on MySQL in Ubuntu:
sudo /etc/init.d/mysql reset-password
I just thought that you might be interested in a small script you can use in Hardy Heron.
It uses the new UFW (Uncomplicated firewall) introduced in this new Ubuntu distro.
The script is well commented, so everything is easy to understand.
Here is the script:
|
1 2 3 4 5 6 7 8 9 10 11 12 13 14 15 16 17 18 19 20 21 22 23 24 25 26 27 28 29 30 31 32 33 34 35 36 37 38 39 40 |
#!/bin/bash ## set the default policy to drop (deny) all connections sudo ufw default deny ## set logging ON sudo ufw logging on ## permit unrestricted traffic from a specific static IP address sudo ufw allow from 192.168.1.1 # maybe your router ## permit TCP connections on ssh port 22 sudo ufw allow 22/tcp ## Allow Apache2 sudo ufw allow 80/tcp ## Allow MySQL sudo ufw allow 3306/tcp ## Allow Bittorrent for port in {7881..7889}; do sudo ufw allow $port/tcp; done ## Allow eMule sudo ufw allow 4662/tcp sudo ufw allow 4672/udp ## Allow DC++ sudo ufw allow 6845 ## Allow Samba from internal network only sudo ufw allow proto tcp from 192.168.1.0/24 to any port 135 # used by smbd sudo ufw allow proto udp from 192.168.1.0/24 to any port 137 # used by nmbd sudo ufw allow proto udp from 192.168.1.0/24 to any port 138 # used by nmbd sudo ufw allow proto tcp from 192.168.1.0/24 to any port 139 # used by smbd sudo ufw allow proto tcp from 192.168.1.0/24 to any port 445 # used by smbd ## Display rules sudo ufw status |
You can modify it by adding/removing rules accordingly.
If you are a MySQL user and you want to have a disaster recovery solution, or even as a simple backup, you can write small shell scripts based on mysqldump tool.
For this, you need AutoMySQLBackup. It doesn’t have any real requirements (mysqldump of course is needed – in any mysql client package – and gzip or bzip2 to compress the resulting file) and has all the features I was looking for in such a script.
AutoMySQLBackup has all the features I needed: it can backup a single database, multiple databases, or all the databases on the server; each database is saved in a separate file that can be compressed (with gzip or bzip2); it will rotate the backups and not keep them filling your hard drive (as normal in the daily backup you will have only the last 7 days of backups, the weekly if enabled will have one for each week, etc.). It has also some other features (check the project homepage for full details), that I am not using myself (like email logs for example), but other peoples might find interesting.
All you have to do is to modify a few things:
# Username to access the MySQL server e.g. dbuser

USERNAME=dbuser

# Username to access the MySQL server e.g. password

PASSWORD=password

# Host name (or IP address) of MySQL server e.g localhost

DBHOST=localhost

# List of DBNAMES for Daily/Weekly Backup e.g. "DB1 DB2 DB3"

DBNAMES="all"

# Backup directory location e.g /backups

BACKUPDIR="/var/backup/mysql"

# Mail setup

MAILCONTENT="quiet"
You can run the script manually but you will want to enable it in cron
and run daily.
Most computers these days come with a myriad of sensors to monitor the temperature of your computer. These sensors are generally located on the processor and the motherboard, and you might also have sensors on your video card. On top of that, all S.M.A.R.T-enabled hard drives have built-in temperature monitoring.
I can show you the steps to enable the temperature sensors in your computer in Ubuntu, or any other version of Linux.
1. Installing the sensor libraries
First thing’s first – you need to install the libraries that allow Linux to read your sensors. To do this, install the lm-sensors library, by running the command:
sudo apt-get install lm-sensors
This will install the libraries for your motherboard’s sensors. For your hard-disk sensors, you’ll want to install hddtemp:
sudo apt-get install hddtemp
In Ubuntu, the install will ask you several questions. Do not be scared, the default settings should work.
2. Running sensors-detect
Now that your sensor libraries are installed, you need to detect your sensors! Run the command:
sudo sensors-detect
Which will probe your system for sensors. Answer “YES” to all questions! Don’t just hit enter, type “YES”, because at the end there will be a question for which the default answer is “no”, and we’ll want to answer in the affirmative.
You willbe asked, at some point, “Do you want to add these lines to /etc/modules automatically? (yes/NO)” This is the question we want to make sure we answer YES to.
3. Loading the modules
Since we answered YES to the previous question, our sensor modules will be loaded by default the next time we start up. But since we don’t want to have to reboot, we’re going to use the information we got from the sensors-detect script to load the modules ourselves, this time only. Right above the last question will appear a list of modules that you should load, in the form of:
#—-cut here—-
# Chip drivers
smsc47m1
#—-cut here—-
You may have more, or different, items listed – that’s fine! What we want to do now, to load these modules, is use the modprobe command, as follows:
sudo modprobe [module name]
4. Monitoring the sensors!
Wow, that was a lot of work! Now, let’s see the rewards. On the command line, you can simply run:
sensors
However, we’d rather have a graphical interface for checking up on our hardware, so let’s install an applet for our Gnome desktop to keep an eye on our system’s temperature. Run the command:
sudo apt-get install sensors-applet
to install the applet. Now, add the applet by right-clicking on your desktop panel, selecting “Add to Panel,” and you will now see a “Hardware Sensors Monitor” applet in the System & Hardware section. Click and drag this to your panel to add it.