Today I’m gonna describe the process I’m using to keep my VM templates up to date.
All the scripts that you need to get started can be found on my GitHub repo. Feel free to get them and use them in any way you might find useful.
Make sure you update the variables inside the json\vars.json file to match your environment.
Either if you have a homelab where you test things or have a full enterprise environment, you will need to make sure you are always deploying the same thing across all your environments, every time, without exception.
For a long time sysadmins used hand-crafted golden images for their OSes that they need to further customize every time they were deploying a new VM.
In today’s modern infrastructures, we need to constantly change things and we need a better way to have these golden images tested and kept up to date.
The article here will show how this can be accomplished for a Windows 2019 OS image. I am usually using this to quickly spin up a bunch of VMs on my vCenter.
They will be configured later to host Domain Controllers, SQL Servers, various web applications, etc.
This allows me to focus on my testing and not spend a lot of time on the infrastructure itself.
The tool we’re going to use is Packer.
It will work out of the box with any major cloud providers and because it’s lightweight, portable and command-line driven, it’s suited for Continuous Delivery pipelines, keep dev/prod parity or to package up software with complex requirements.
The installation of Packer is really simple and all the needed steps are described in the docs.
On my GitHub Repo you’ll find a small script that you can use to download the latest version of Packer.
The first step is to have a template for our build. This is just a JSON file that contains information about how packer needs to access my infrastructure, access keys, various settings for my image.
{
  "variables": {
    "vsphere_server": "vcenter@local",
    "vsphere_user": "administrator@vsphere.local",
    "vsphere_password": "YourSecretPasswordHere",
    "vsphere_template_name": "Win2019Core",
    "vsphere_folder": "",
    "vsphere_dc_name": "",
    "vsphere_compute_cluster": "",
    "vsphere_resource_pool": "",
    "vsphere_host": "esxi01.vsphere.local",
    "vsphere_portgroup_name": "",
    "vsphere_datastore": "",
    "windows_admin_password": "",
    "cpu_num": "1",
    "mem_size": "2048",
    "disk_size": "10000",
    "os_iso_url": "",
    "os_iso_path": "",
    "os_iso_checksum": "",
    "os_iso_checksum_type": "",
    "vmtools_iso_path": ""
  },
  "sensitive-variables": [
    "vsphere_password",
    "winadmin_password"
  ],
  "builders": [
    {
      "type": "vsphere-iso",
      "username": "{{user vsphere_user}}",
      "vcenter_server": "{{user vsphere_server}}",
      "insecure_connection": "true",
      "datacenter": "{{user vsphere_dc_name}}",
      "host": "{{user vsphere_host}}",
      "datastore": "{{user vsphere_datastore}}",
      "vm_name": "{{user vsphere_template_name}}",
      "folder": "{{user vsphere_folder}}",
      "CPUs": "{{user cpu_num}}",
      "RAM": "{{user mem_size}}",
      "RAM_reserve_all": true,
      "firmware": "bios",
      "communicator": "winrm",
      "winrm_username": "Administrator",
      "winrm_password": "{{user windows_admin_password}}",
      "disk_controller_type": "lsilogic-sas",
      "floppy_files": [
        "answer_files/win2019core/autounattend.xml",
        "scripts/Enable-WinRM.ps1",
        "scripts/Install-VMTools.ps1",
        "scripts/Set-Default-Shell.ps1",
        "scripts/SysPrepWin.ps1"
      ],
      "guest_os_type": "windows9_64Guest",
      "iso_paths": [
        "{{user os_iso_path}}",
        "{{user vmtools_iso_path}}"
      ],
      "remove_cdrom": true,
      "network_adapters": [
        {
          "network_card": "vmxnet3"
        }
      ],
      "password": "{{user vsphere_password}}",
      "resource_pool": "{{user vsphere_resource_pool}}",
      "storage": [
        {
          "disk_size": "{{user disk_size}}",
          "disk_thin_provisioned": true
        }
      ],
      "convert_to_template": true,
      "notes": "created on: {{isotime}}"
    }
  ],
  "provisioners": [
    {
      "inline": [
        "dir c:\\"
      ],
      "type": "windows-shell"
    }
  ]
}
In a second step I need to make sure I have a valid configuration. Packer has a validate command for this:
packer validate json\windows_2019.json
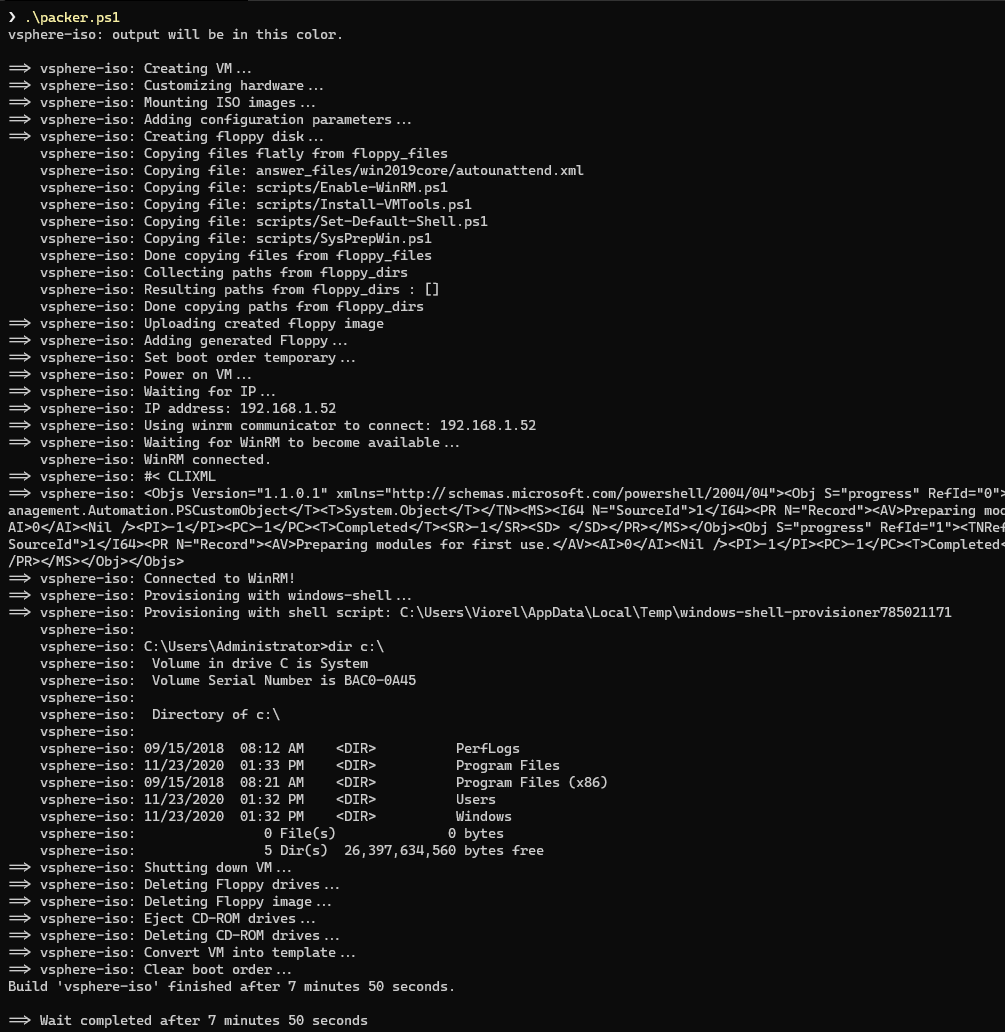
In step 3, after the validation is successful, I can proceed to building the image.
packer.exe build -force -var-file='json\vars.json' 'json\windows_2019.json'
Notice that I’m passing the var-file option in order to tell packer where my variables are defined.
WARNING: This file will hold your secrets so be very careful about who’s able to access it.
{
    "vsphere_server": "vcenter@local",
    "vsphere_user": "administrator@vsphere.local",
    "vsphere_password": "YourSecretPasswordHere",
    "vsphere_template_name": "Win2019Core",
    "vsphere_folder": "Templates",
    "vsphere_dc_name": "DataCenterName",
    "vsphere_resource_pool": "Packer",
    "vsphere_host": "esxi01.vsphere.local",
    "vsphere_portgroup_name": "lab_portgroup",
    "vsphere_datastore": "N3_SSD_123_EVO",
    "windows_admin_password": "YourSecretPasswordHere",
    "linux_admin_password": "YourSecretPasswordHere",
    "cpu_num": "2",
    "mem_size": "4096",
    "disk_size": "32768",
    "os_iso_path": "[iso] WIN2019/17763.737.190906-2324.rs5_release_svc_refresh_SERVER_EVAL_x64FRE_en-us_1.iso",
    "vmtools_iso_path": "[iso] VMware Tools/VMware-tools-windows-11.1.1-16303738.iso"
}
The force option will instruct packer to force a builder to run when artifacts from a previous build prevent a build from running.
This parameter can behave differently for each builder, but in general it will remove the artifacts from the previous build.
Check out the docs about what options you can use for the build command.
At this point we have an image that’s ready to be used.
In the example scripts I’m using, you will notice that in order to allow packer to connect to the image, I enabled WinRM connectivity over http.
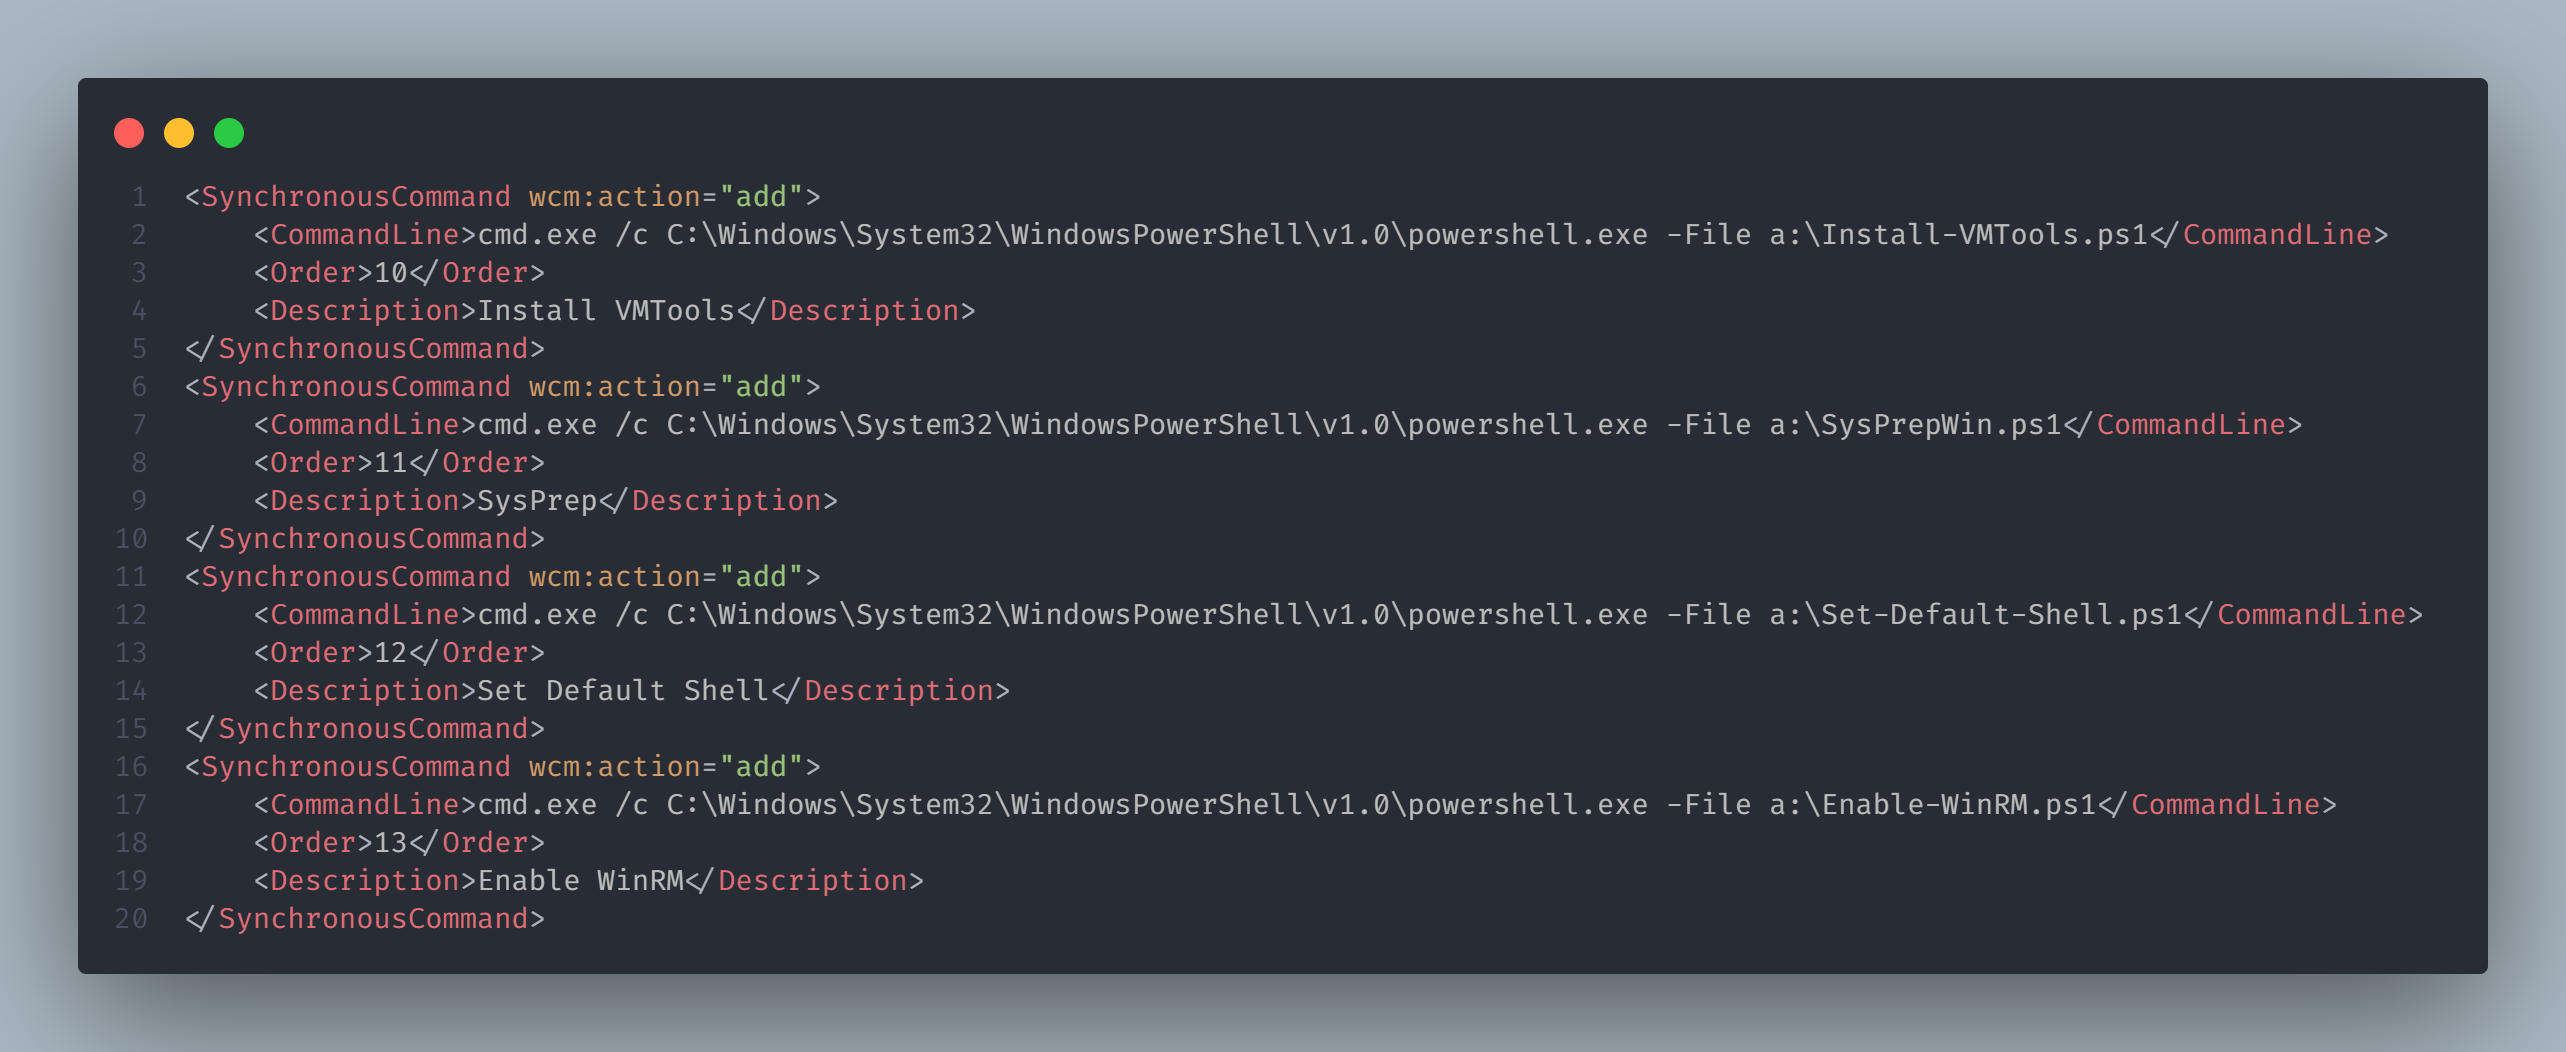
This was executed as the last action in the answer_files\win2019core\autounattend.xml file:
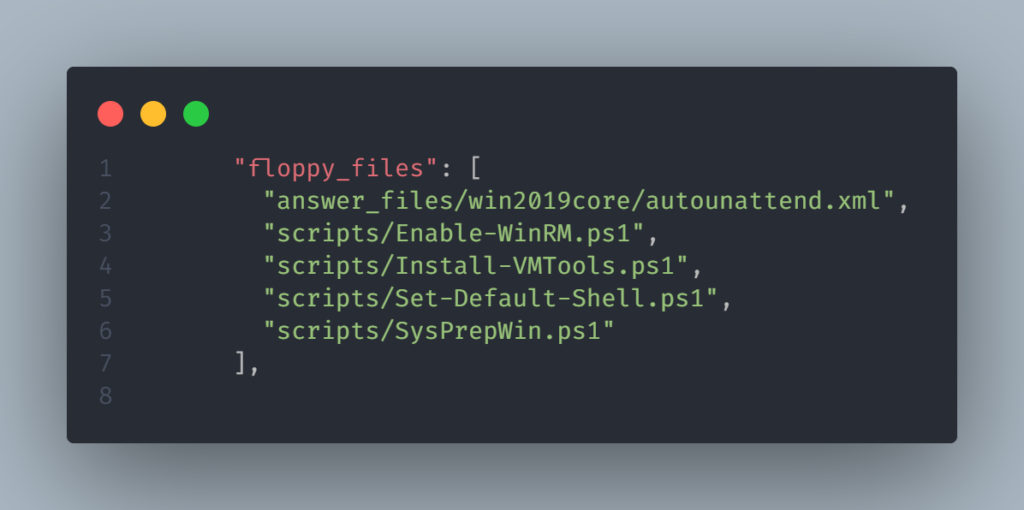
This approach is used to perform an Unattended Installation for Windows and this is the reason we have the floppy_files section in our JSON template:
As a good practice we should make sure that after all the customization is done, we should leave the template in a clean and secure state.
This is not a trivial task and should not be taken lightly as doing it wrong can expose you to a bunch of security issues.
It’s not the scope of this article, but you can read a more in-depth analysis on this blog post:
https://missionimpossiblecode.io/post/winrm-for-provisioning-close-the-door-on-the-way-out-eh/
To sum up, in my environment it takes about 8 minutes to finish a build.
I hope this will give you a better insight on how to prepare and maintain your images, either on-premises or in the cloud.
Thanks for reading!