Category Archives: Ubuntu - Page 5

Enable/Disable GDM in Ubuntu

By default Ubuntu Loads Gnome GUI.
If you need to disable X.org / Gnome under Linux, so you can get text only login, this is the right guide to follow.

Using command line (CLI):
Ubuntu comes with rcconf and update-rc.d command.
rcconf allows you to control which services are started when the system boots up or reboots. It displays a menu of all the services which could be started at boot.
The ones that are configured to do so are marked and you can toggle individual services on and off.
Install rcconf:

Now start rcconf:

Now you will be prompted for the administrator password, this is necessary because the changes done with this tool will affect the whole system. After entering the administrator password, the following text based window is displayed on screen:rcconf
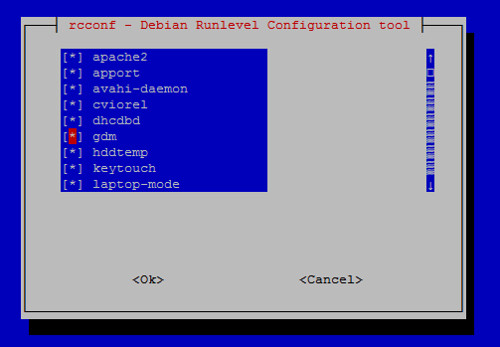
Next enable/disable GDM service by pressing space bar (check the checkbox) > Click OK to save the changes.

Using GUI tools:
The Services Administration Tool allows you to specify which services will be started during the system boot process.
You can type the command:

Or just click on System -> Administration -> Services
Again you will be prompted for the administrator password, this is necessary because the changes done with this tool will affect the whole system. After entering the administrator password, the following window is displayed:

ubuntu-linux-services
Make sure you remove GDM (Gnome login manager) by disabling the the checkbox and close the window.

Alternative method (wich seems to be a better approach):

PulseAudio and 5.1 surround sound on Hardy Heron

The new Ubuntu 8.04 look very good and has many improvements over the older releases. I will not discuss about them now. I’ll just stick on the new default sound server, PulseAudio that offers sophisticated mixing capabilities and network transparency.
The purpose of this post is to help other Ubuntu users to enable 5.1 surround sound on their computers, using PulseAudio (you must have a 5.1 capable sound card).
I have a Creative Labs SB Audigy sound card but I tested this solution on a Creative Labs SB Live!. The results were the same in both cases.
The solution is very simple. Run this in your terminal:

Uncomment the line containing:

and replace '2' with '6' (if you have a 7.1 card, replace '2' with '8')
Restart the window manager and enjoy the new sound!

Sample firewall script for Ubuntu

I just thought that you might be interested in a small script you can use in Hardy Heron.

It uses the new UFW (Uncomplicated firewall) introduced in this new Ubuntu distro.

The script is well commented, so everything is easy to understand.

Here is the script:

You can modify it by adding/removing rules accordingly.

My experience with Ubuntu 8.04 Hardy Heron Beta

After a few tests with the new beta from Ubuntu, I decided to write some of my thoughts about this release.
Please note that this is a BETA release, has many unresolved bugs and needs to be polished before the final release.
Overall, everything seems better. A new host-based firewall application, the new Vinagre VNC client, Firefox 3 Beta 4 replaces Firefox 2 as the default browser, PulseAudio is now enabled by default, PolicyKit is now integrated in the administrative user interfaces, linux kernel 2.6.24, Xorg 7.3, GNOME 2.22, a few new compiz plugins.
In my opinion, there is a downside in this release regarding the PulseAudio sound server. Some non-GNOME applications still need to be changed to output to pulse/esd by default and the volume control tools are not yet integrated. Users with Audigy1 sound cards will be suprised to find out that the 5.1 output is not so good as it was in ALSA. It will be very difficult for a beginner to configure by hand the audio for best results in sound quality.
Anyway, many of this bugs will be resolved until the final release. Can’t wait!

Ubuntu brainstorm launched!

Ubuntu now has its own Brainstorm website where people can add their ideas and vote for their favorites.
http://brainstorm.ubuntu.com/

Get System Information Using the Terminal

Troubleshooting, upgrading, or just curious? Find out what’s in your system without opening the case. Using these Linux command line tools, you can get details about your hardware and distribution.

I’ve tested these commands in Ubuntu 7.10, but they should all work in other Linux distributions. Unless noted otherwise, all of this software is included by default with Ubuntu.

Graphics card:

– details about OpenGL, the Xserver, and your graphics card

– do you have direct 3d rendering?

– graphics card vendor

– specific graphics card model

– a simple 3d benchmark, prints frame rate to the terminal

– supported display resolutions

Audio:

– audio controller

– more audio device information

Software versions:

– current distribution and version

– packagename’s version and dependencies

– Linux kernel version

– all kernel details

Networking:

– Ethernet controllers

– networking interfaces, IP addresses, and more

Processor:

– all processors, clock speeds, flags, and more

– processor load average for the last 1, 5, and 15 minutes

– press C key to sort processes by CPU usage

Memory:

– amount of RAM and swap, and how much is being used for what

– total, used, and free memory shown in MB

– press M key to sort processes by memory usage

Hard disks:

– partitions, as well as their mount-points and usage in GB

– all partitions, their device names, and positions on disk

USB devices:

– USB buses and attached devices

Even more:

– monitor for hardware changes

– all PCI devices

(install from package hwinfo) – overview of all hardware, as well as more detailed info

– another program for listing hardware

– lists hardware with HTML output in the w3m web browser

– current time elapsed since last reboot, users, and load average

Errors from scrollkeeper during updates from gutsy?

During the updates, you receive some weird errors about scrollkeeper.
To fix this, just run the fallowing command in your terminal:
sudo dpkg-reconfigure scrollkeeper
It will take a while, but you get the job done!

Installing NoMachine NX on Ubuntu 7.10

NX allows you to run remote X11 sessions even across slow or low-bandwidth network connections, making it possible to start sessions from clients running on Windows, Linux, Mac OS X and Solaris platforms to servers running, at present, on Linux or Solaris. Note that development for extending server support to Windows and Mac OS X platforms is in progress.

NX, thanks to exclusive X protocol compression techniques and an integrated set of proxy agents, improves the power of the X Window System to transparently run graphical desktops and applications through the network, by reducing round-trips and implementing strict flow-control of data traveling through low-bandwidth links. Even on slow or low-bandwidth network connections, you can get impressive performance thanks to NX’s lazy encoding algorithm and NX’s capability to automatically tune itself to network bandwidth and latency parameters.

Moreover, NX also can connect to remote RDP and VNC servers, relying on the rdesktop and TightVNC clients by encapsulating the RDP or RFB session within the X11 session.

Here’s a screenshot:

Diagrams showing how NX works. (Copyright NoMachine)

Session shadowing

Desktop sharing

An X11 session

Look at the screenshots below to find out how to get started with NX:

First download the files for the server from here.

For Ubuntu, use NX Free Edition for Linux DEB – i386.

You’ll need to download three files: client, node and server.

Change your working directory to the location where you saved the package and install it by running from a console:

For detailed instructions on how to install the NX Client, NX Node and NX Server packages, please look here.
sudo dpkg -i nxclient_3.1.0-2_i386.deb
sudo dpkg -i nxnode_3.1.0-3_i386.deb
sudo dpkg -i nxserver_3.1.0-2_i386.deb

After installing the server, on your Windows computer, download nxclient for Windows and install it.

Once it’s installed, run it, and enter the IP address of your Linux computer to connect, give it a session name for your own reference, and choose your connection speed.

Here you can download the manual or you can view it online here.