Ubuntu now has its own Brainstorm website where people can add their ideas and vote for their favorites.
http://brainstorm.ubuntu.com/
Author Archives: cviorel - Page 10
Ubuntu brainstorm launched!
Posted by cviorel
on February 29, 2008
No comments | This post has 1,258 views.
Unp
Posted by cviorel
on February 20, 2008
No comments | This post has 1,305 views.
Unp is a small perl script which makes extraction of any archive files a bit easier. It support several compressors and archiver programs, chooses the right one(s) automatically and extracts one or more files in one go.
Instalation:
sudo apt-get install unp
Usage:
usage: unp file [file]...

file: compressed file(s) to expand
Use -- to pass arguments to external programs, eg. some tar options:
unp fastgl.tgz xmnt.tgz -- -C /tmp
Special option:
-f Continue even if program availability checks fail
-u For Debian packages:
- extract data.tar.gz after each operation
- extract control.tar.gz in control//
For other archives:
- create directory /
- extract contents there
currently supported extensions and formats are
tar[.gz,.bz2], gz, bz2, Z, ar/deb, rpm, shar, rar, arj, zip, LHa, cab, ace,
tnef, uu (mail, news), mime, hqx, sea, zoo, pmd, cpio, afio, lzop
Problem:
It doesn’t extract files from RAR archives with full path!
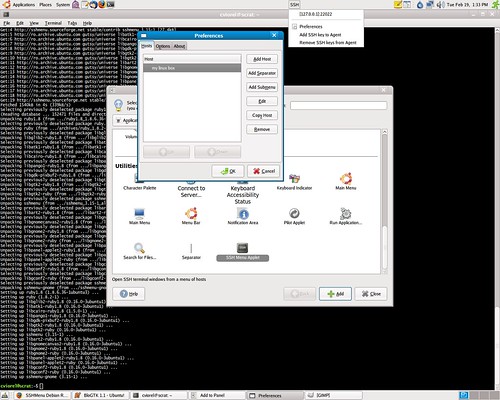
SSHMenu
Posted by cviorel
on February 19, 2008
No comments | This post has 2,981 views.
SSHMenu is a GNOME panel applet* that keeps all your regular SSH connections within a single mouse click.
To install it on Ubuntu, add this entry to your /etc/apt/sources.list:
deb http://sshmenu.sourceforge.net/debian stable contrib
Then you have to import the repository key:
gpg --keyserver subkeys.pgp.net --recv-keys 4CC00851
gpg --export --armor 4CC00851 | sudo apt-key add -
Run:
sudo apt-get update
and then:
sudo apt-get install sshmenu-gnome
Here is a screenshot:
Get System Information Using the Terminal
Posted by cviorel
on February 19, 2008
No comments | This post has 2,214 views.
Troubleshooting, upgrading, or just curious? Find out what’s in your system without opening the case. Using these Linux command line tools, you can get details about your hardware and distribution.
I’ve tested these commands in Ubuntu 7.10, but they should all work in other Linux distributions. Unless noted otherwise, all of this software is included by default with Ubuntu.
Graphics card:
|
1 |
glxinfo |
– details about OpenGL, the Xserver, and your graphics card
|
1 |
glxinfo | grep direct |
– do you have direct 3d rendering?
|
1 |
glxinfo | grep vendor |
– graphics card vendor
|
1 |
lspci | grep VGA |
– specific graphics card model
|
1 |
glxgears |
– a simple 3d benchmark, prints frame rate to the terminal
|
1 |
xrandr |
– supported display resolutions
Audio:
|
1 |
lspci | grep Audio |
– audio controller
|
1 |
aplay --list-devices |
– more audio device information
Software versions:
|
1 |
cat /etc/issue |
– current distribution and version
|
1 |
apt-cache showpkg packagename |
– packagename’s version and dependencies
|
1 |
uname -r |
– Linux kernel version
|
1 |
uname -a |
– all kernel details
Networking:
|
1 |
lspci | grep Ethernet |
– Ethernet controllers
|
1 |
ifconfig |
– networking interfaces, IP addresses, and more
Processor:
|
1 |
cat /proc/cpuinfo |
– all processors, clock speeds, flags, and more
|
1 |
cat /proc/loadavg |
– processor load average for the last 1, 5, and 15 minutes
|
1 |
top |
– press C key to sort processes by CPU usage
Memory:
|
1 |
cat /proc/meminfo |
– amount of RAM and swap, and how much is being used for what
|
1 |
free -m |
– total, used, and free memory shown in MB
|
1 |
top |
– press M key to sort processes by memory usage
Hard disks:
|
1 |
df -H |
– partitions, as well as their mount-points and usage in GB
|
1 |
sudo fdisk -l |
– all partitions, their device names, and positions on disk
USB devices:
|
1 |
lsusb |
– USB buses and attached devices
Even more:
|
1 |
lshal -m |
– monitor for hardware changes
|
1 |
lspci |
– all PCI devices
|
1 |
hwinfo --short |
(install from package hwinfo) – overview of all hardware, as well as more detailed info
|
1 |
lshw |
– another program for listing hardware
|
1 |
lshw -html | w3m -T text/html |
– lists hardware with HTML output in the w3m web browser
|
1 |
uptime |
– current time elapsed since last reboot, users, and load average
Set Drivel to Post to Your WordPress Blog
Posted by cviorel
on February 12, 2008
No comments | This post has 1,107 views.
Drivel is a nice blog editor for Gnome. To install it on Ubuntu, run this in your terminal:
sudo apt-get install drivel
Now you need to configure Drivel to connect to your blog. Go to Applications -> Internet. Select Drivel Journal Editor.
When the dialog box appears, input your username and password into the first two textboxes. For Server Type, select Movable Type from the dropdown. Now the tricky part, for the server address you will need to enter the full path to the xmlrpc.php file on the server (for example http://www.yourdomain.com/yoursubdirectory/xmlrpc.php). Check the Remember password checkbox and the Automatically login checkboxes (if desired) and click the Log In button.
Happy posting!
Errors from scrollkeeper during updates from gutsy?
Posted by cviorel
on February 12, 2008
No comments | This post has 1,042 views.
During the updates, you receive some weird errors about scrollkeeper.
To fix this, just run the fallowing command in your terminal:
sudo dpkg-reconfigure scrollkeeper
It will take a while, but you get the job done!
Installing Google Earth in Ubuntu (7.10 Gutsy)
Posted by cviorel
on January 15, 2008
No comments | This post has 1,074 views.
If you like Google Earth then you will like it in Ubuntu. Installation is simple, here we go:
1. Open a terminal
Insert this code:
wget http://dl.google.com/earth/client/current/GoogleEarthLinux.bin
2. When the file has finished downloading, insert this code in your terminal to install:
sudo sh GoogleEarthLinux.bin
3. The Google Earth Setup window opens, if the default installation paths are fine to you, click ‘Begin Install’
4. The program installs itself and when it has completed click ‘Start’.
Advanced mode (using Medibuntu repository):
1. Add Medibuntu to your sources.list, as well as its GPG key to your keyring. Make sure to use the correct sources.list that corresponds to your current distribution:
Ubuntu 6.06 “Dapper Drake”:
sudo wget http://www.medibuntu.org/sources.list.d/dapper.list -O /etc/apt/sources.list.d/medibuntu.list
Ubuntu 6.10 “Edgy Eft”:
sudo wget http://www.medibuntu.org/sources.list.d/edgy.list -O /etc/apt/sources.list.d/medibuntu.list
Ubuntu 7.04 “Feisty Fawn”:
sudo wget http://www.medibuntu.org/sources.list.d/feisty.list -O /etc/apt/sources.list.d/medibuntu.list
Ubuntu 7.10 “Gutsy Gibbon”:
sudo wget http://www.medibuntu.org/sources.list.d/gutsy.list -O /etc/apt/sources.list.d/medibuntu.list
Then, add the GPG Key:
wget -q http://packages.medibuntu.org/medibuntu-key.gpg -O- | sudo apt-key add - && sudo apt-get update
2. Insert this code in your terminal to install:
sudo apt-get install googleearth
3. Enjoy!
Installing NoMachine NX on Ubuntu 7.10
Posted by cviorel
on January 15, 2008
No comments | This post has 1,220 views.
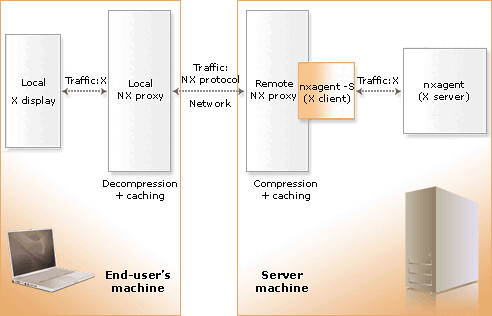
NX allows you to run remote X11 sessions even across slow or low-bandwidth network connections, making it possible to start sessions from clients running on Windows, Linux, Mac OS X and Solaris platforms to servers running, at present, on Linux or Solaris. Note that development for extending server support to Windows and Mac OS X platforms is in progress.
NX, thanks to exclusive X protocol compression techniques and an integrated set of proxy agents, improves the power of the X Window System to transparently run graphical desktops and applications through the network, by reducing round-trips and implementing strict flow-control of data traveling through low-bandwidth links. Even on slow or low-bandwidth network connections, you can get impressive performance thanks to NX’s lazy encoding algorithm and NX’s capability to automatically tune itself to network bandwidth and latency parameters.
Moreover, NX also can connect to remote RDP and VNC servers, relying on the rdesktop and TightVNC clients by encapsulating the RDP or RFB session within the X11 session.
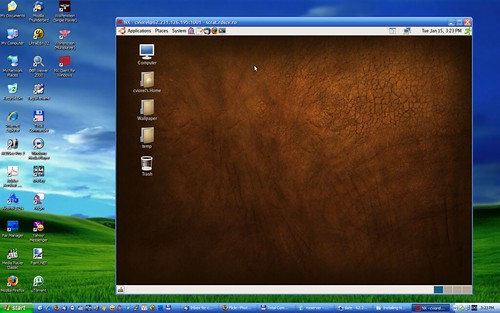
Here’s a screenshot:
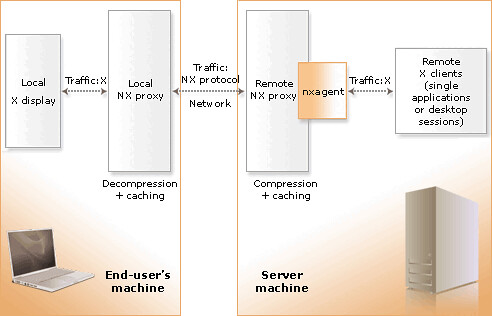
Diagrams showing how NX works. (Copyright NoMachine)
Session shadowing
Desktop sharing

An X11 session
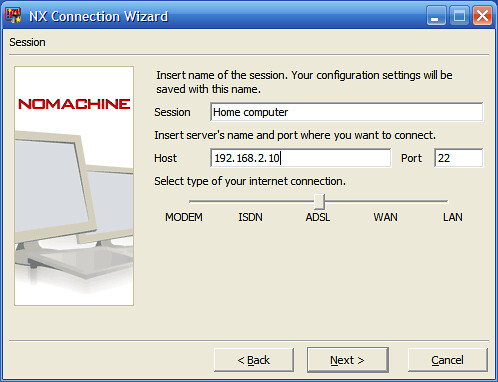
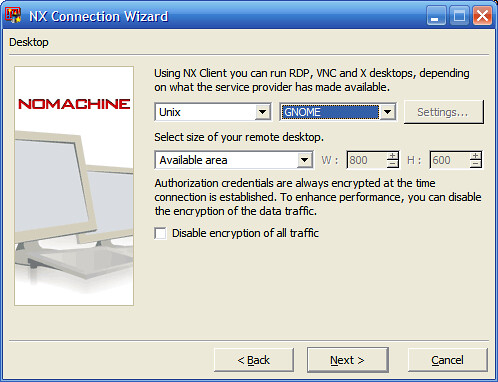
Look at the screenshots below to find out how to get started with NX:
First download the files for the server from here.
For Ubuntu, use NX Free Edition for Linux DEB – i386.
You’ll need to download three files: client, node and server.
Change your working directory to the location where you saved the package and install it by running from a console:
For detailed instructions on how to install the NX Client, NX Node and NX Server packages, please look here.
sudo dpkg -i nxclient_3.1.0-2_i386.deb

sudo dpkg -i nxnode_3.1.0-3_i386.deb

sudo dpkg -i nxserver_3.1.0-2_i386.deb
After installing the server, on your Windows computer, download nxclient for Windows and install it.
Once it’s installed, run it, and enter the IP address of your Linux computer to connect, give it a session name for your own reference, and choose your connection speed.

Here you can download the manual or you can view it online here.
KeyTouch – The easy way to enable multimedia-keys!
Posted by cviorel
on January 2, 2008
No comments | This post has 1,248 views.
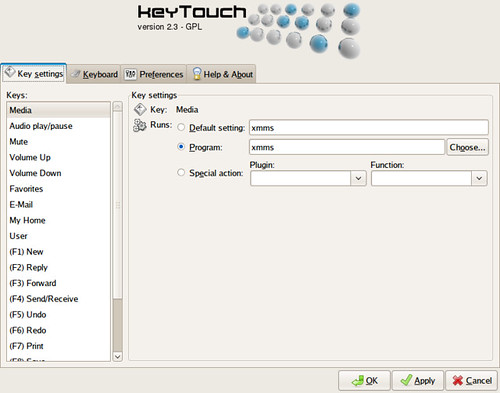
Keytouch allows the selection of profiles to select your keyboard model from a list in its database. If your keyboard is not present, you can “train” it by starting up keytouch editor and pressing the relevant keys whilst identifying them.
It comprises of two tools: KeyTouch – The tool to setup a keyboard that is already in the database.
KeyTouch-Editor – The tool to setup your keyboard by teaching it. You select your multimedia keyboards input, then press keys and indetify them from a drop down list. Save the configuration file when your done and simply import into Keytouch itself.
Installing KeyTouch & KeyTouch Editor
Open a terminal and enter these commands:
sudo apt-get install keytouch keytouch-editor
More details, here.
Nokia 6230 on Ubuntu
Posted by cviorel
on November 27, 2007
No comments | This post has 1,136 views.
Wammu is mobile phone manager running on Linux, Windows and possibly other platforms, where Gammu and wxPython works.
To install it on Ubuntu issue the following command:
sudo apt-get install wammu
Here is a screenshot:

To make your Nokia 6230 connect to Ubuntu using a bluetooth device, edit your ~/.gammurc file to contain:
[gammu]

port = xx:xx:xx:xx:xx:xx

connection = bluerfphonet

name = Nokia 6230

model =
Replace xx:xx:xx:xx:xx:xx with the MAC address of your phone.
To find out the MAC address of your phone, run:
hcitool scan
You can now launch Wammu and start playing with the phone.