Just found about this add-on: Ubuntu Forums Menu.
The extension adds additional navigation menu for Ubuntu Forums via main-menu and context to Firefox.
Get it from here.
Author Archives: cviorel - Page 8
Ubuntu Forums Menu
Posted by cviorel
on December 4, 2008
No comments | This post has 1,165 views.
No virtualbox kernel driver after kernel upgrade
Posted by cviorel
on November 28, 2008
No comments | This post has 1,135 views.
After kernel upgrade, your VirtualBox modules will not be updated.
As a result, your virtual machines will not work.
Here is a quick fix. Run this in your terminal:
|
1 |
sudo /etc/init.d/vboxdrv setup |
Java is unable to print to CUPS printers
Posted by cviorel
on November 13, 2008
1 comment | This post has 1,301 views.
If you’re using a CUPS printer on Ubunutu (or other linux distro) you may not print from Java.
There is a quick fix taken from here.
Add an /etc/cups/client.conf file containing:
|
1 |
ServerName localhost |
Terminator – nice multi terminal application for Linux
Posted by cviorel
on November 12, 2008
No comments | This post has 1,411 views.
Hi folks!
I’ve been using Terminator for quite a long time now and I find it very usefull.
Install it in Ubuntu by running:
|
1 |
sudo apt-get install terminator |
There is a feature I would like to see in the future releases: saving the layout of the window or maybe a way to start the application with the predefined number of tabs.
Cannot use USB devices on Virtualbox 2 in Intrepid
Posted by cviorel
on November 11, 2008
3 comments | This post has 2,000 views.
There is a quick fix if you get some USB related errors when opening Preferences in Virtualbox 2.
You only have to add these lines in your /etc/fstab file:
|
1 2 |
# usbfs none /proc/bus/usb usbfs devgid=46,devmode=664 0 0 |
Nokia N73 synchronization with opensync under Ubuntu 8.04
Posted by cviorel
on November 5, 2008
2 comments | This post has 1,998 views.
Yeap, Nokia N73 is a great phone and the N-Series PC Suite looks very nice.
But if you are using Linux, you can’t use the Windows PC Suite. Don’t hurry to fire up a Virtualbox or VMWare machine running Winblows just for that. My guess is is that if you are using an USB cable, it won’t work.
But the good news is that you can use OpenSync to synchronize your Nokia Symbian based phone, with your Evolution (Calendar, Tasks and Contacts) and/or with Google Calendar.
OpenSync act as an mediator between to entity to be synchronized, mapping the data between the entities types and synchronizing when possible the records exchanged, in case of conflict the standard behavior is to prompt the user for correction/decision.
I will explain the steps to you need to follow to sync a Nokia N73 (or any Symbian based phone) with Linux (I used Ubuntu 8.04), via bluetooth. Many credits going to Nailor which posted a nice guide on Ubuntu Forums.
1. Install the needed packages:
|
1 2 3 4 5 6 7 |
sudo apt-get -y install multisync-tools sudo apt-get -y install multisync0.90 sudo apt-get -y install opensync-plugin-evolution sudo apt-get -y install opensync-plugin-irmc sudo apt-get -y install opensync-plugin-syncml sudo apt-get -y install opensyncutils sudo apt-get -y install opensync-plugin-google-calendar #if you wish to synchronize with Google Calendar |
2. Configure msynctool:
You can configure opensync via a graphical interface using multisync-qad (using similiar settings as below) or you can use command line. Guide below is for commandline.
|
1 |
msynctool --addgroup Nokia |
Add plugins to group. If you get errors, they are propably due to missing plugins so check you’ve installed all required plugins.
|
1 2 |
msynctool --addmember Nokia evo2-sync msynctool --addmember Nokia syncml-obex-client |
Next is the ‘trickiest’ part. Installed plugins need to be configured. First, you have to find your phone’s MAC. Use hcitool to do that:
|
1 |
hcitool scan |
It should return something like:
|
1 2 |
Scanning ... xx:xx:xx:xx:xx:xx cviorel-N73 |
Now, configure the syncml-obex-client:
|
1 |
msynctool --configure Nokia 2 |
Replace the context of the configuration (should be open in separate editor after running previous command) with the following XML:
|
1 2 3 4 5 6 7 8 9 10 11 12 13 14 15 16 17 18 19 |
<config> <bluetooth_address>xx:xx:xx:xx:xx:xx</bluetooth_address> <bluetooth_channel>10</bluetooth_channel> <interface>0</interface> <identifier>PC Suite</identifier> <version>1</version> <wbxml>1</wbxml> <username></username> <password></password> <type>2</type> <usestringtable>1</usestringtable> <onlyreplace>0</onlyreplace> <!-- This needs to be set to 10 000, otherwise you'll be sending more data than your phone can handle. --> <recvLimit>10000</recvLimit> <maxObjSize>0</maxObjSize> <contact_db>Contacts</contact_db> <calendar_db></calendar_db> <note_db></note_db> </config> |
To find out what bluetooth_channel to use, run:
|
1 |
sdptool browse xx:xx:xx:xx:xx:xx |
and look for SyncMLClient:
|
1 2 3 4 5 6 7 8 9 10 11 12 13 14 15 16 |
Service Name: SyncMLClient Service RecHandle: 0x10011 Service Class ID List: UUID 128: 00000002-0000-1000-8000-0002ee000002 Protocol Descriptor List: "L2CAP" (0x0100) "RFCOMM" (0x0003) Channel: 10 "OBEX" (0x0008) Language Base Attr List: code_ISO639: 0x454e encoding: 0x6a base_offset: 0x100 Profile Descriptor List: "" (0x00000002-0000-1000-8000-0002ee000002) Version: 0x0100 |
After configuring the syncml-obex-client it’s time to configure evo2-sync. Open configuration file with command:
|
1 |
msynctool --configure Nokia 1 |
It should look like this, so you don’t need to modify it:
|
1 2 3 4 5 |
<config> <address_path>default</address_path> <calendar_path>default</calendar_path> <tasks_path>default</tasks_path> </config> |
4. Sync!
You should be good to go now, so you should try synchronizing:
|
1 |
msynctool --sync Nokia |
Ubuntu 8.10 on Lenovo ThinkPad T61
Posted by cviorel
on November 2, 2008
7 comments | This post has 3,147 views.
Just installed Ubuntu 8.10 on my T61. Works great!
I hated that bloated Vista Business!
Items that work out of the box:
– Nvidia: 2D works, 3D requires the installation of the proprietary drivers (nVidia Quadro NVS 140)
– Wireless: Atheros card
– Bluetooth keys
– Brightness keys
– Network Card Intel 10/100/1000
– Firewire
– Wireless switch
– 4-in-1 card reader
Worked with some simple tweaking:
– fingerprint reader for login and sudo
1. Install latest thinkfinger packages:
|
1 |
sudo apt-get install thinkfinger-tools libpam-thinkfinger |
2. Update the pam configuration files:
|
1 |
sudo /usr/lib/pam-thinkfinger/pam-thinkfinger-enable |
3. Restart computer
4. Enroll your fingerprint (creates $HOME/.thinkfinger.bir)
|
1 |
tf-tool --acquire |
5. Check fingerprint enrollment
|
1 |
tf-tool --verify |
My custom bash prompt (PS1)
Posted by cviorel
on October 9, 2008
No comments | This post has 1,344 views.
aria2 – wget and curl replacement
Posted by cviorel
on September 3, 2008
No comments | This post has 2,508 views.
aria2 is a command line utility for downloading files. The supported protocols are HTTP(S), FTP, BitTorrent (DHT, PEX, MSE/PE), and Metalink. To install it on Ubuntu, just type in terminal:
|
1 |
sudo apt-get install aria2 |
Enable/Disable GDM in Ubuntu
Posted by cviorel
on July 2, 2008
No comments | This post has 2,545 views.
By default Ubuntu Loads Gnome GUI.
If you need to disable X.org / Gnome under Linux, so you can get text only login, this is the right guide to follow.
Using command line (CLI):
Ubuntu comes with rcconf and update-rc.d command.
rcconf allows you to control which services are started when the system boots up or reboots. It displays a menu of all the services which could be started at boot.
The ones that are configured to do so are marked and you can toggle individual services on and off.
Install rcconf:
|
1 |
sudo apt-get install rcconf |
Now start rcconf:
|
1 |
sudo rcconf |
Now you will be prompted for the administrator password, this is necessary because the changes done with this tool will affect the whole system. After entering the administrator password, the following text based window is displayed on screen: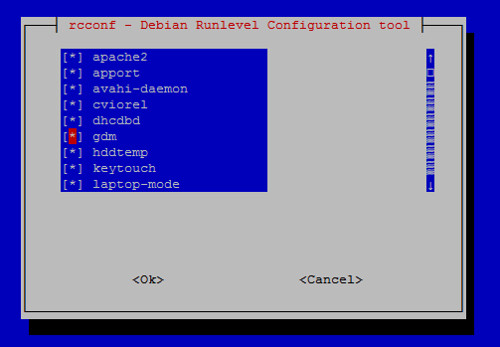
Next enable/disable GDM service by pressing space bar (check the checkbox) > Click OK to save the changes.
Using GUI tools:
The Services Administration Tool allows you to specify which services will be started during the system boot process.
You can type the command:
|
1 |
services-admin |
Or just click on System -> Administration -> Services
Again you will be prompted for the administrator password, this is necessary because the changes done with this tool will affect the whole system. After entering the administrator password, the following window is displayed:

Make sure you remove GDM (Gnome login manager) by disabling the the checkbox and close the window.
Alternative method (wich seems to be a better approach):
|
1 2 |
sudo mv /etc/rc2.d/S30gdm /etc/rc2.d/disabled-S30gdm sudo mv /etc/rc2.d/K30gdm /etc/rc2.d/disabled-K30gdm |